

Salesforce data is already full of relationships. An Account has Contacts. A Contact belongs to an Account. Opportunities, Cases, assets, partners, and parent companies all add more connections. The trouble is that users usually see those relationships one related list at a time.
A knowledge graph changes the view. Instead of asking someone to open five tabs and mentally assemble the story, it puts the records and their relationships on one explorable canvas. Until recently, building that experience directly on Salesforce meant either squeezing a graph library into a Lightning Web Component or hosting a separate React application and taking responsibility for authentication, API access, and deployment. Salesforce Multi-Framework gives us a third option: build with React and its npm ecosystem, but deploy and run the app on Salesforce.
Multi-Framework became generally available in June 2026, and GA support for Data SDK and GraphQL record access followed in July. That makes this a supported architecture rather than a beta experiment. Availability still depends on the org's edition, language, and Hyperforce support, so check the Salesforce Multi-Framework release note and Data SDK release note before starting.
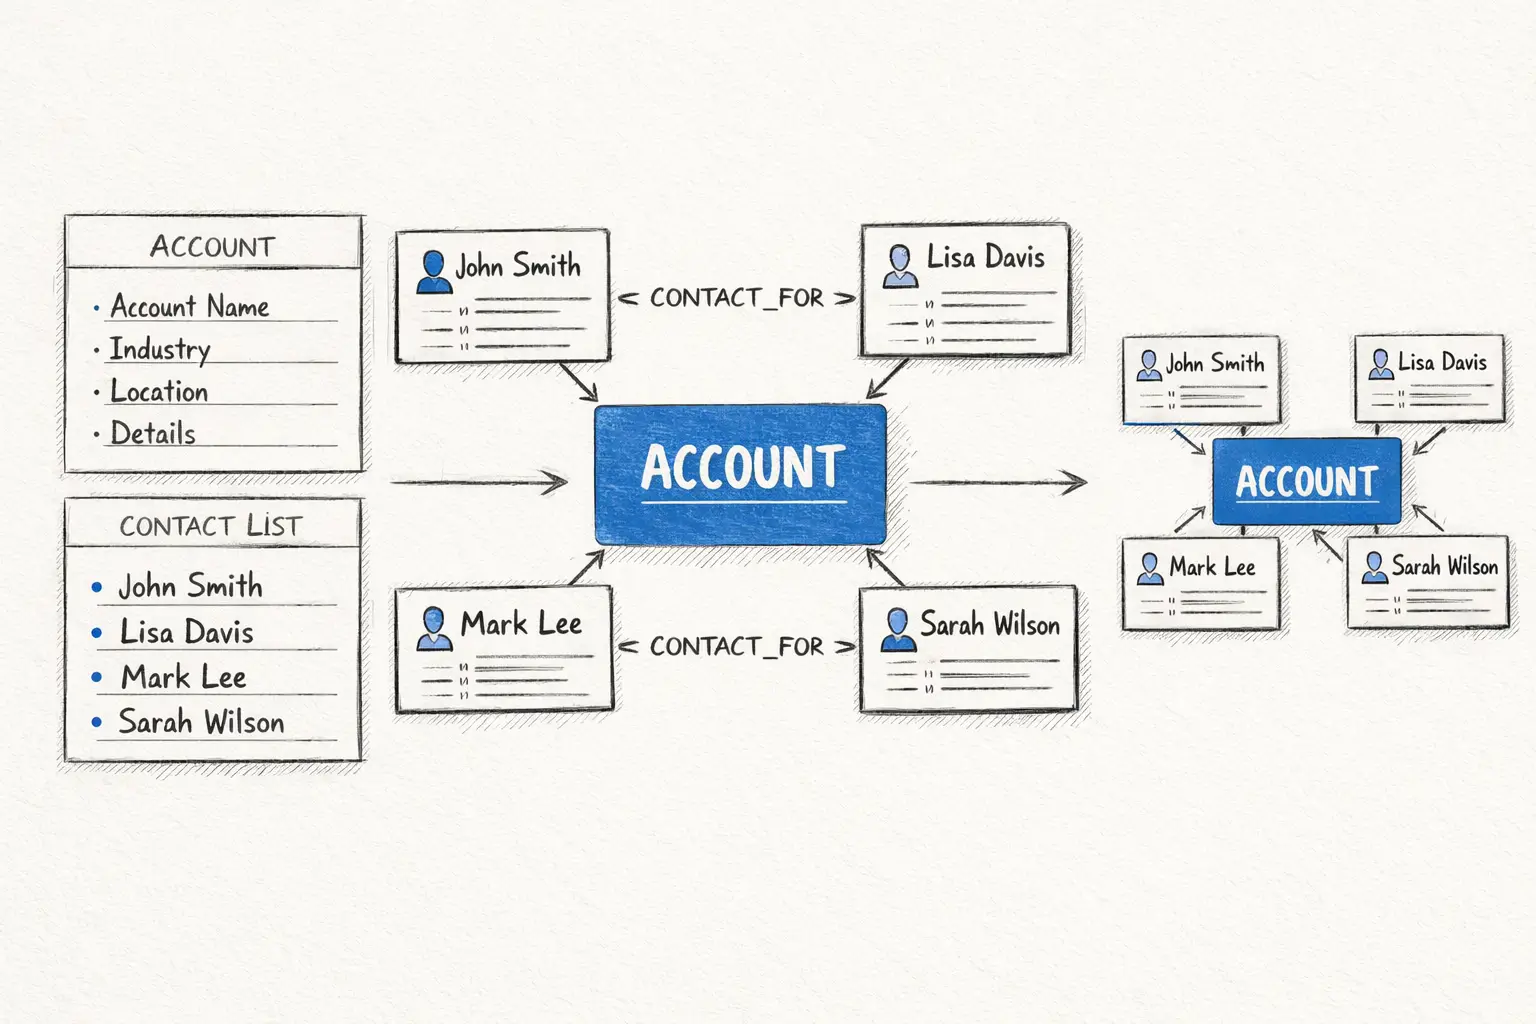
We will build the smallest useful Salesforce knowledge graph: one Account connected to its Contacts. The Account and Contacts become nodes, and each Contact is connected to the Account by a CONTACT_FOR edge. That narrow model is enough to show the complete pattern without turning the example into a data-model exam. Once it works, Opportunities, Cases, parent Accounts, and custom relationships can be added by repeating the same steps.
What makes this a knowledge graph?
The term knowledge graph covers a wide range of systems. Here, it means a practical property graph for one Salesforce use case: records become nodes, business relationships become labeled edges, and selected fields become properties. This is not an enterprise ontology, an inference engine, or a second database. It is a read-only graph view of records that remain in Salesforce.
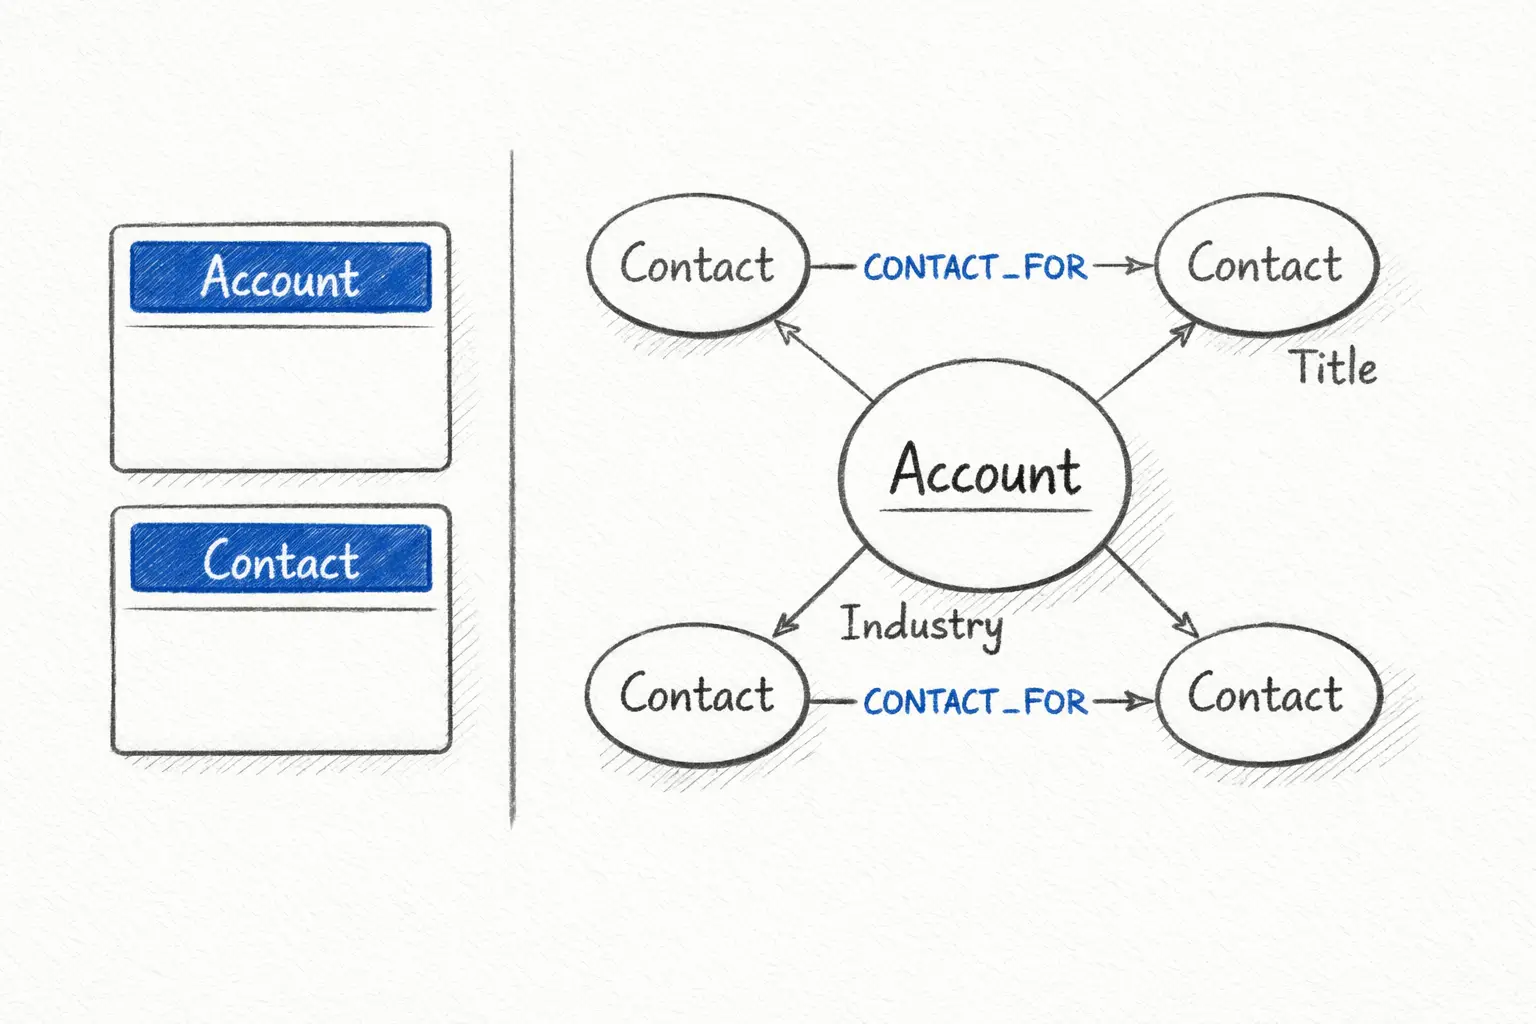
In our example, the Account and its Contacts are the nodes. The standard Account–Contact association becomes a CONTACT_FOR edge from each Contact to the Account. Industry and job title are properties shown when someone selects a node.
The model has three ingredients. Entities are the records we want to understand, while relationships explain the business meaning that connects them. Properties hold the facts that describe an entity or relationship. Naming those parts before writing code keeps Salesforce fields, graph semantics, and visual styling from being mixed together.
Salesforce already supplies much of this structure through lookups, master-detail relationships, and child relationships. We query a relevant neighborhood of records, convert the response into a graph-shaped object, and render it in the browser. Salesforce remains the source of truth and enforces record access.
Begin with a question, not a canvas
Graph demos often begin by pulling every available record and celebrating when the screen fills with dots. It looks impressive for about ten seconds. Then it becomes a knot. A useful graph begins with the question the user is trying to answer, because that question determines the root record, the relationships worth following, and the amount of data the interface should load.
An account team might ask which Contacts are associated with a customer, which people they should know about, what role each person holds, or which Contact deserves a closer look. For this tutorial, the question is narrower: Which Contacts are associated with this Account? That sentence gives us a natural boundary. We need one Account and a controlled number of its Contacts, not every Account and Contact in the org.
The first version should also remain read-only. Let users explore the graph and open a detail panel before adding graph-based editing. A drag gesture should move a node on the canvas; it should not silently change a Salesforce relationship.
Model the graph before writing React
Imagine an Account named Acme Manufacturing with two Contacts: Maya Chen, VP of Operations, and Luis Gomez, IT Director. The graph contains three nodes and two edges. Selecting Maya shows her title; selecting Acme shows its industry.
Nodes: Acme Manufacturing, Maya Chen, Luis Gomez
Edges: Maya → Acme, Luis → Acme
The next step is to translate that business question into a small data model. Writing the mapping down before opening the React project makes naming decisions visible and gives the query a clear target. For this example, the entire model fits in one table:
| Salesforce data | Graph element | Meaning or properties |
|---|---|---|
| Account | Node | Name, Industry |
| Contact | Node | Name, Title |
Contact.AccountId | Edge | CONTACT_FOR from Contact to Account |
Use Salesforce record IDs as node IDs. They are stable within the org and make deduplication straightforward. A node can appear through more than one traversal, so the adapter should add it once and reuse it.
Give every edge a type. An unlabeled line says only that two things are connected. A typed edge says why.
For custom or inferred relationships, resist the temptation to bury semantics in JavaScript. If Contact A influences Opportunity B is a business fact worth sharing, it should come from governed data or server-side logic. Depending on the use case, that could be a custom junction object, Data Cloud data, or an Apex service that calculates and returns the relationship. The browser should present the meaning, not invent it. We will leave those advanced edges out of the first implementation.
Why Salesforce Multi-Framework changes the implementation
Multi-Framework packages the React app as a UIBundle inside a Salesforce DX project, so it can be versioned and deployed with the rest of the org's metadata. For an internal app, a CustomApplication makes the bundle available from the App Launcher, while profiles and permission sets control access. Salesforce describes the structure and the internal-versus-external app options in the Multi-Framework developer guide.
The React application can use normal npm packages. That is the part that makes knowledge-graph work much more pleasant. We can select a graph renderer based on the problem instead of writing canvas physics from scratch.
The choice of renderer depends on what the graph must do. A small relationship explorer values a compact React API, while an analysis-heavy application may need algorithms or WebGL rendering. Three open-source libraries cover those needs well:
| Library | Best fit | Tradeoff |
|---|---|---|
| react-force-graph | Fast React prototypes and interactive force-directed graphs | Excellent rendering API, but graph analysis is not its main job |
| Cytoscape.js | Rich interaction, layouts, selectors, and graph algorithms | More concepts and configuration to learn |
| Sigma.js with Graphology | Large graphs that benefit from WebGL rendering and a separate graph model | More setup than a small Account-neighborhood view needs |
We will use react-force-graph-2d because it can render a { nodes, links } object with very little setup. Keeping the Salesforce adapter independent of the renderer leaves room to move to Cytoscape.js or Sigma.js if the requirements grow. The first library choice therefore stays practical without becoming a permanent architectural commitment.
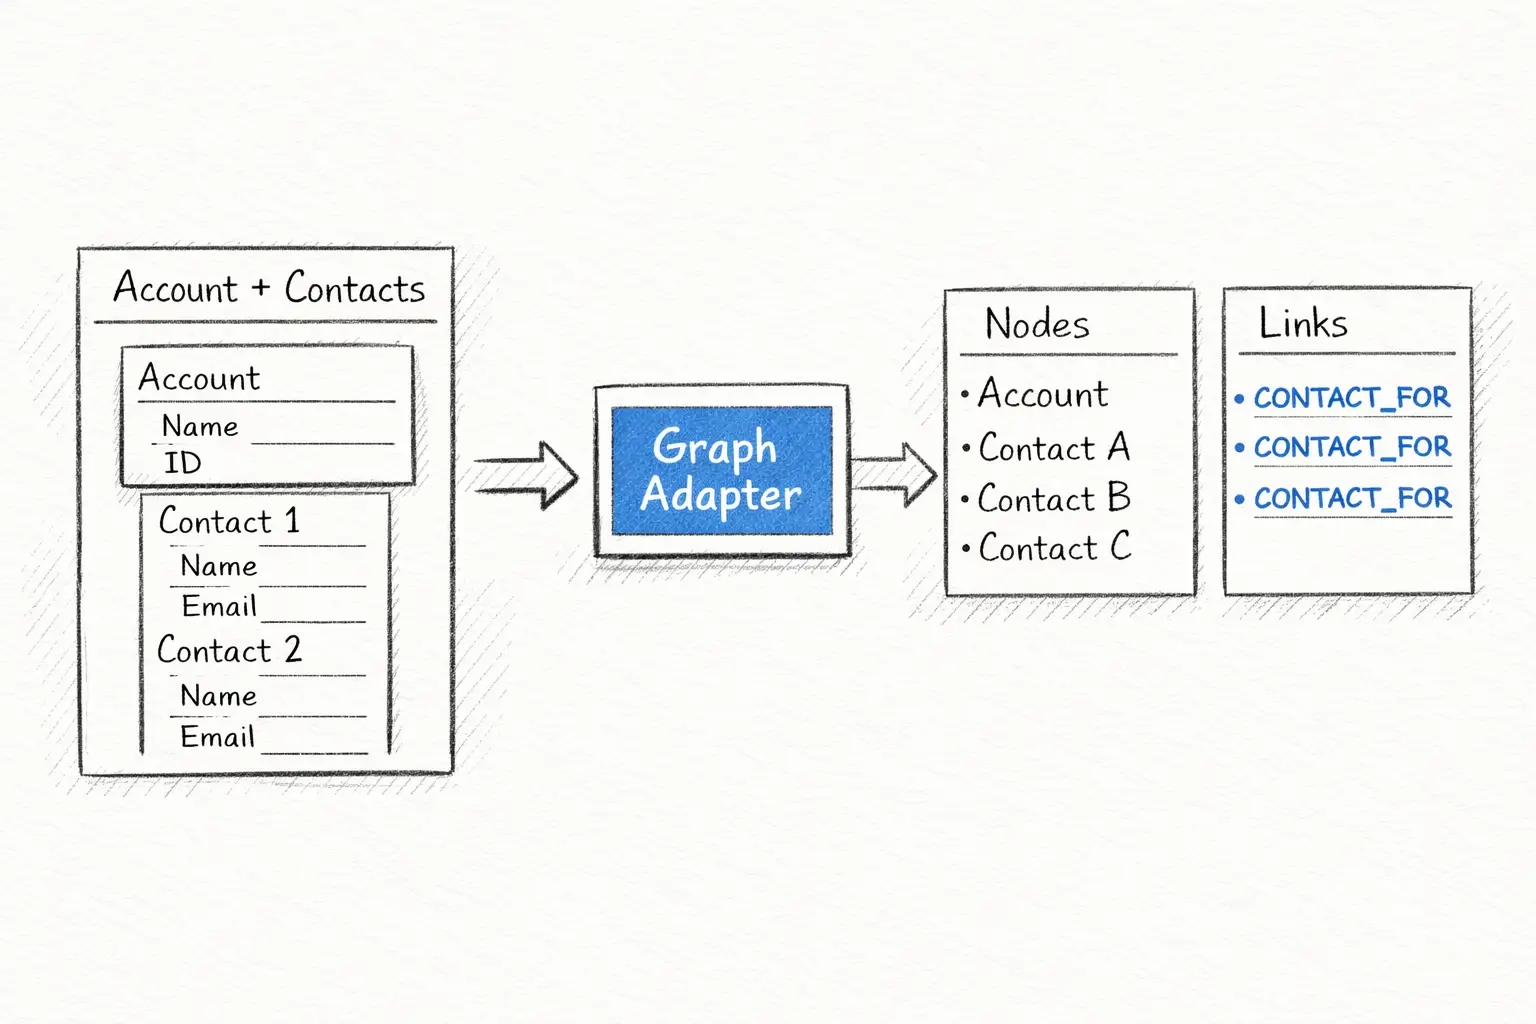
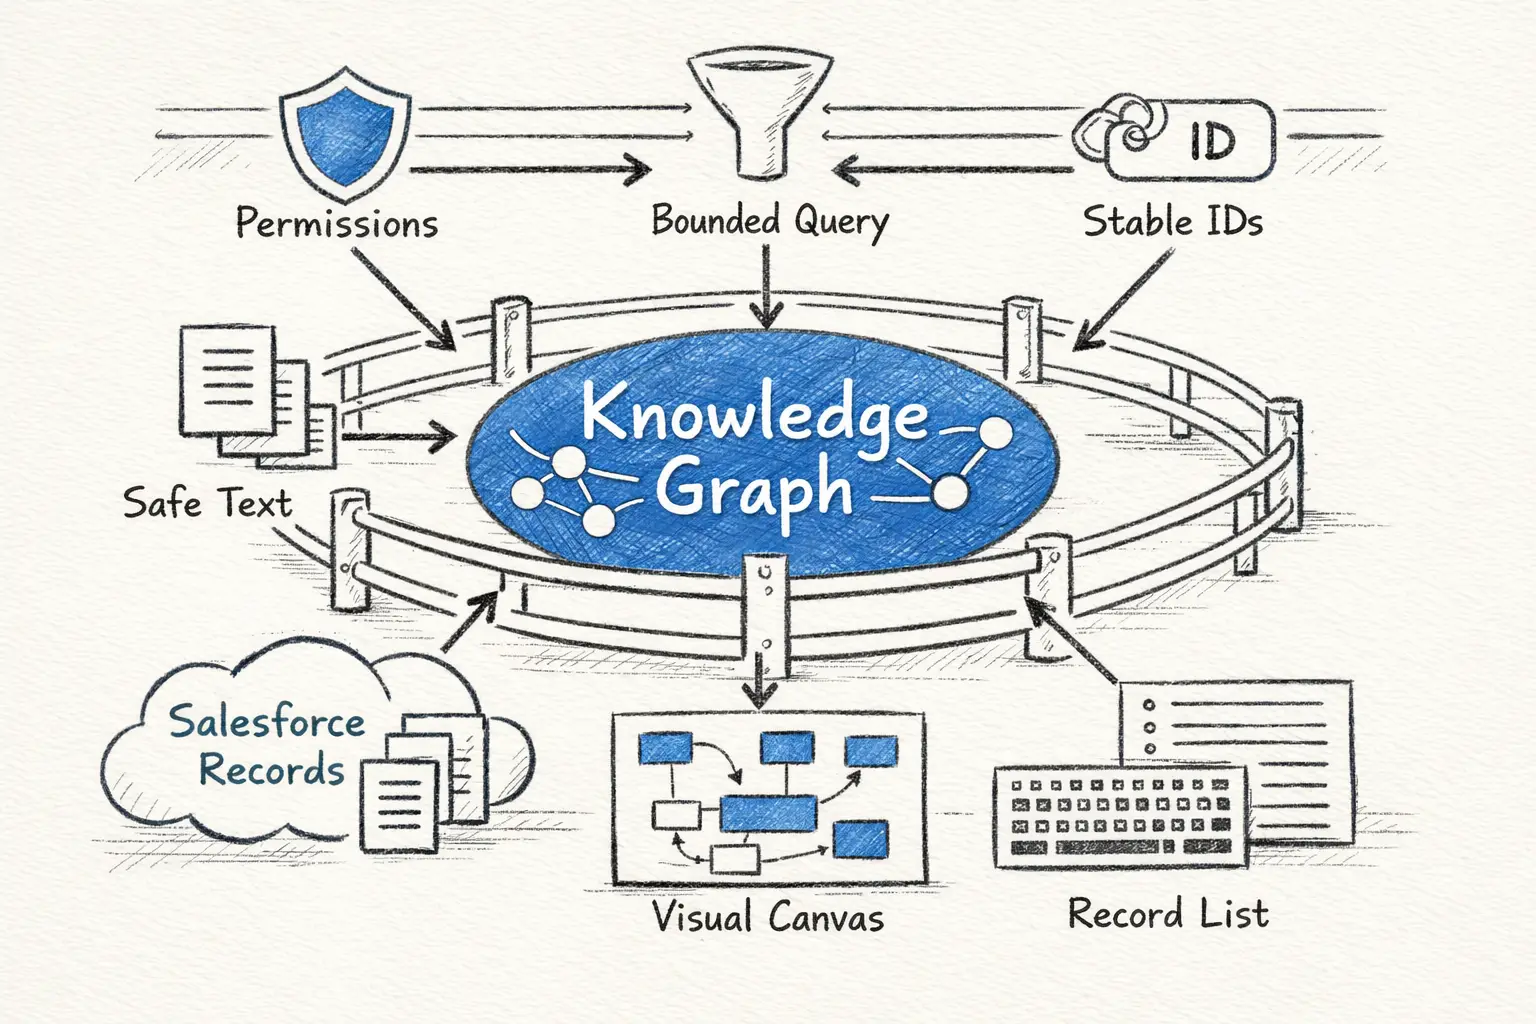
The implementation has four boundaries. Salesforce records remain the source data, and Data SDK with GraphQL queries them in the context of the signed-in user. A small TypeScript adapter turns the UI API response into nodes and links. The React renderer receives that neutral graph object and handles layout, zoom, pan, hit testing, and selection.
The Data SDK documentation recommends GraphQL for record access. The SDK takes care of authentication, CSRF handling, and Salesforce base-path resolution. Do not replace it with a raw fetch() or Axios call to Salesforce endpoints.
UI API GraphQL also keeps the current user's permissions in the picture. The GraphQL object-query documentation states that object-level and field-level access control which objects and fields are available. That is much safer than sending a broad dataset to the browser and hiding restricted fields with CSS.
Scaffold the Salesforce React app
First confirm that the org meets the current prerequisites. Multi-Framework is available only in supported editions on Hyperforce, and internal apps require the Salesforce app domain. The exact Setup steps are in Configure Your Org for React App Development.
Work in an existing Salesforce DX project so the React bundle and its supporting metadata can be deployed together. Start by updating Salesforce CLI and authorizing the development org with a memorable alias. The final command generates a basic React UI bundle under the project's default package directory:
sf update
sf org login web --alias graph-dev

sf template generate ui-bundle \
  --name accountKnowledgeGraph \
  --label "Account Knowledge Graph" \
  --template reactbasic \
  --output-dir force-app/main/default
The current CLI options are documented under {{MPC-TOKEN-0}}. Open the generated bundle's README because the template can evolve independently of this article. Keep any newer template conventions when they differ from incidental file names in this example.
Next, move into the generated uiBundles/accountKnowledgeGraph folder. Install the dependencies created by the template, then add the graph renderer used in this article. Start the Salesforce-aware development server against the same org alias:
npm install
npm install react-force-graph-2d

sf ui-bundle dev --target-org graph-dev --open
The {{MPC-TOKEN-0}} command starts the local dev server and an authenticated proxy to the org. Open the proxy URL it provides, not the Vite URL directly, when testing Salesforce data access. Keep the generated Vite and Salesforce configuration intact. Add the knowledge-graph code inside the bundle's src directory rather than building a second React project beside it.
Query a small neighborhood with GraphQL
Salesforce GraphQL record queries use a Relay-style connection. Collections arrive as edges, and each edge contains a node. Fields such as Name, Industry, and Title expose their scalar value through a nested value property.
The query below loads one Account and no more than 25 related Contacts. It sorts Contacts by name so repeated runs have a predictable order. It also asks for totalCount and pageInfo, which let the interface disclose when more Contacts exist than the first page displays:
import { gql } from '@salesforce/platform-sdk/data';

export const ACCOUNT_GRAPH_QUERY = gql`
  query AccountGraph($accountId: ID!) {
    uiapi {
      query {
        Account(
          first: 1
          where: { Id: { eq: $accountId } }
        ) {
          edges {
            node {
              Id
              Name {
                value
              }
              Industry @optional {
                value
              }
              Contacts(
                first: 25
                orderBy: { Name: { order: ASC } }
              ) {
                totalCount
                pageInfo {
                  hasNextPage
                  endCursor
                }
                edges {
                  node {
                    Id
                    Name {
                      value
                    }
                    Title @optional {
                      value
                    }
                  }
                }
              }
            }
          }
        }
      }
    }
  }
`;
The @optional directive is useful for fields that some users may not be allowed to see. It lets a query succeed without returning that field. Do not interpret an absent optional field as proof that the value does not exist; it may be unavailable to the current user.
Contacts is the child relationship on Account. Relationship names can differ for custom objects and managed packages, so fetch your org's GraphQL schema and run code generation before expanding the example. Salesforce's Multi-Framework Recipes repository contains current examples of schema retrieval, type generation, related-record queries, error handling, and testing.
The next file describes the part of the response that this small app uses and calls the query through the GA Data SDK. The hand-written interfaces keep the tutorial readable, although generated types are the better choice once the project grows. Salesforce recommends passing explicit response and variables types to query<T, V>().
import { createDataSDK } from '@salesforce/platform-sdk/data';
import { ACCOUNT_GRAPH_QUERY } from './accountGraphQuery';

type FieldValue<T> = {
  value: T | null;
};

export interface ContactRecord {
  Id: string;
  Name?: FieldValue<string> | null;
  Title?: FieldValue<string> | null;
}

export interface AccountRecord {
  Id: string;
  Name?: FieldValue<string> | null;
  Industry?: FieldValue<string> | null;
  Contacts?: {
    totalCount?: number | null;
    pageInfo?: {
      hasNextPage: boolean;
      endCursor?: string | null;
    } | null;
    edges?: Array<{
      node?: ContactRecord | null;
    } | null> | null;
  } | null;
}

interface AccountGraphResponse {
  uiapi?: {
    query?: {
      Account?: {
        edges?: Array<{
          node?: AccountRecord | null;
        } | null> | null;
      } | null;
    } | null;
  } | null;
}

interface AccountGraphVariables {
  accountId: string;
}

export async function loadAccountGraph(
  accountId: string
): Promise<AccountRecord> {
  const sdk = await createDataSDK();

  const result =
    await sdk.graphql?.query<
      AccountGraphResponse,
      AccountGraphVariables
    >({
      query: ACCOUNT_GRAPH_QUERY,
      variables: { accountId },
    });

  if (!result) {
    throw new Error('GraphQL is not available in this runtime.');
  }

  if (result.errors?.length) {
    throw new Error(result.errors.map(error => error.message).join('; '));
  }

  const account =
    result.data?.uiapi?.query?.Account?.edges?.[0]?.node;

  if (!account) {
    throw new Error('The Account was not found or is not accessible.');
  }

  return account;
}
Notice the optional chaining through result.data. That is important in the GA SDK because data can be absent even when a response object exists. The explicit errors also give the page component something useful to show instead of allowing a missing record to become an undefined-property failure.
Convert Salesforce records into nodes and typed links
Do not hand a Salesforce API response directly to a visualization component. The response shape belongs to Salesforce; the graph shape belongs to the UI. An adapter between them makes each side easier to test and change.
The adapter needs a small model that does not depend on Salesforce's connection format or a particular visualization library. Nodes carry a stable ID, a type, a label, and a limited property bag. Links carry their endpoints and a relationship type, while the summary tells the interface whether it is showing a partial neighborhood:
export type GraphNodeType = 'Account' | 'Contact';

export interface GraphNode {
  id: string;
  type: GraphNodeType;
  label: string;
  properties: Record<string, string | number | null>;
}

export interface GraphLink {
  source: string;
  target: string;
  type: 'CONTACT_FOR';
}

export interface GraphData {
  nodes: GraphNode[];
  links: GraphLink[];
  summary: {
    displayedContacts: number;
    totalContacts: number;
    hasMoreContacts: boolean;
  };
}
The transformation can now normalize the Account response and deduplicate records by Salesforce ID. Maps prevent the same node or relationship from being added twice if a later query reaches it through more than one path. The function also converts missing optional fields into explicit null values rather than leaking API response details into the renderer:
import type { AccountRecord } from './loadAccountGraph';
import type { GraphData, GraphLink, GraphNode } from './graphModel';

export function toGraph(account: AccountRecord): GraphData {
  const nodes = new Map<string, GraphNode>();
  const links = new Map<string, GraphLink>();

  const addNode = (node: GraphNode) => nodes.set(node.id, node);

  addNode({
    id: account.Id,
    type: 'Account',
    label: account.Name?.value ?? 'Unnamed Account',
    properties: {
      industry: account.Industry?.value ?? null,
    },
  });

  for (const edge of account.Contacts?.edges ?? []) {
    const contact = edge?.node;
    if (!contact) continue;

    addNode({
      id: contact.Id,
      type: 'Contact',
      label: contact.Name?.value ?? 'Unnamed Contact',
      properties: {
        title: contact.Title?.value ?? null,
      },
    });
    const link: GraphLink = {
      source: contact.Id,
      target: account.Id,
      type: 'CONTACT_FOR',
    };
    links.set(
      `${link.type}:${link.source}:${link.target}`,
      link
    );
  }

  const graphLinks = [...links.values()];

  return {
    nodes: [...nodes.values()],
    links: graphLinks,
    summary: {
      displayedContacts: graphLinks.length,
      totalContacts:
        account.Contacts?.totalCount ?? graphLinks.length,
      hasMoreContacts:
        account.Contacts?.pageInfo?.hasNextPage ?? false,
    },
  };
}
For a production app, generate these response types from the org's GraphQL schema rather than maintaining them by hand. The important point is that the Salesforce response stops at the adapter boundary; the renderer receives only GraphData. This adapter also keeps the page summary, so the UI can be honest when the first 25 Contacts are not the whole relationship.
Put the pieces together
The missing step in many graph tutorials is the component that actually runs the query, calls the adapter, and handles the wait. This page component accepts an Account ID as a prop and owns the loading and error states. Its effect also ignores a stale response when the Account changes or the component unmounts:
import { useEffect, useState } from 'react';
import { loadAccountGraph } from './loadAccountGraph';
import { toGraph } from './toGraph';
import { AccountKnowledgeGraph } from './AccountKnowledgeGraph';
import type { GraphData } from './graphModel';

interface AccountGraphPageProps {
  accountId: string;
}

export function AccountGraphPage({
  accountId,
}: AccountGraphPageProps) {
  const [graph, setGraph] = useState<GraphData | null>(null);
  const [error, setError] = useState<string | null>(null);

  useEffect(() => {
    let ignore = false;
    setGraph(null);
    setError(null);

    loadAccountGraph(accountId)
      .then(account => {
        if (!ignore) setGraph(toGraph(account));
      })
      .catch(reason => {
        if (!ignore) {
          setError(
            reason instanceof Error
              ? reason.message
              : 'Unable to load the graph.'
          );
        }
      });

    return () => {
      ignore = true;
    };
  }, [accountId]);

  if (error) return <p role="alert">{error}</p>;
  if (!graph) return <p>Loading Account relationships…</p>;

  return <AccountKnowledgeGraph graph={graph} />;
}
For the first run in a development or test org, pass an Account ID copied from a Salesforce record URL. If you need sample data, create Acme Manufacturing with Contacts Maya Chen and Luis Gomez, matching the model earlier in the article. In a real app, the Account ID would normally come from a picker or route parameter. The full data path is now visible: loadAccountGraph() → toGraph() → AccountKnowledgeGraph.
Render the graph in React
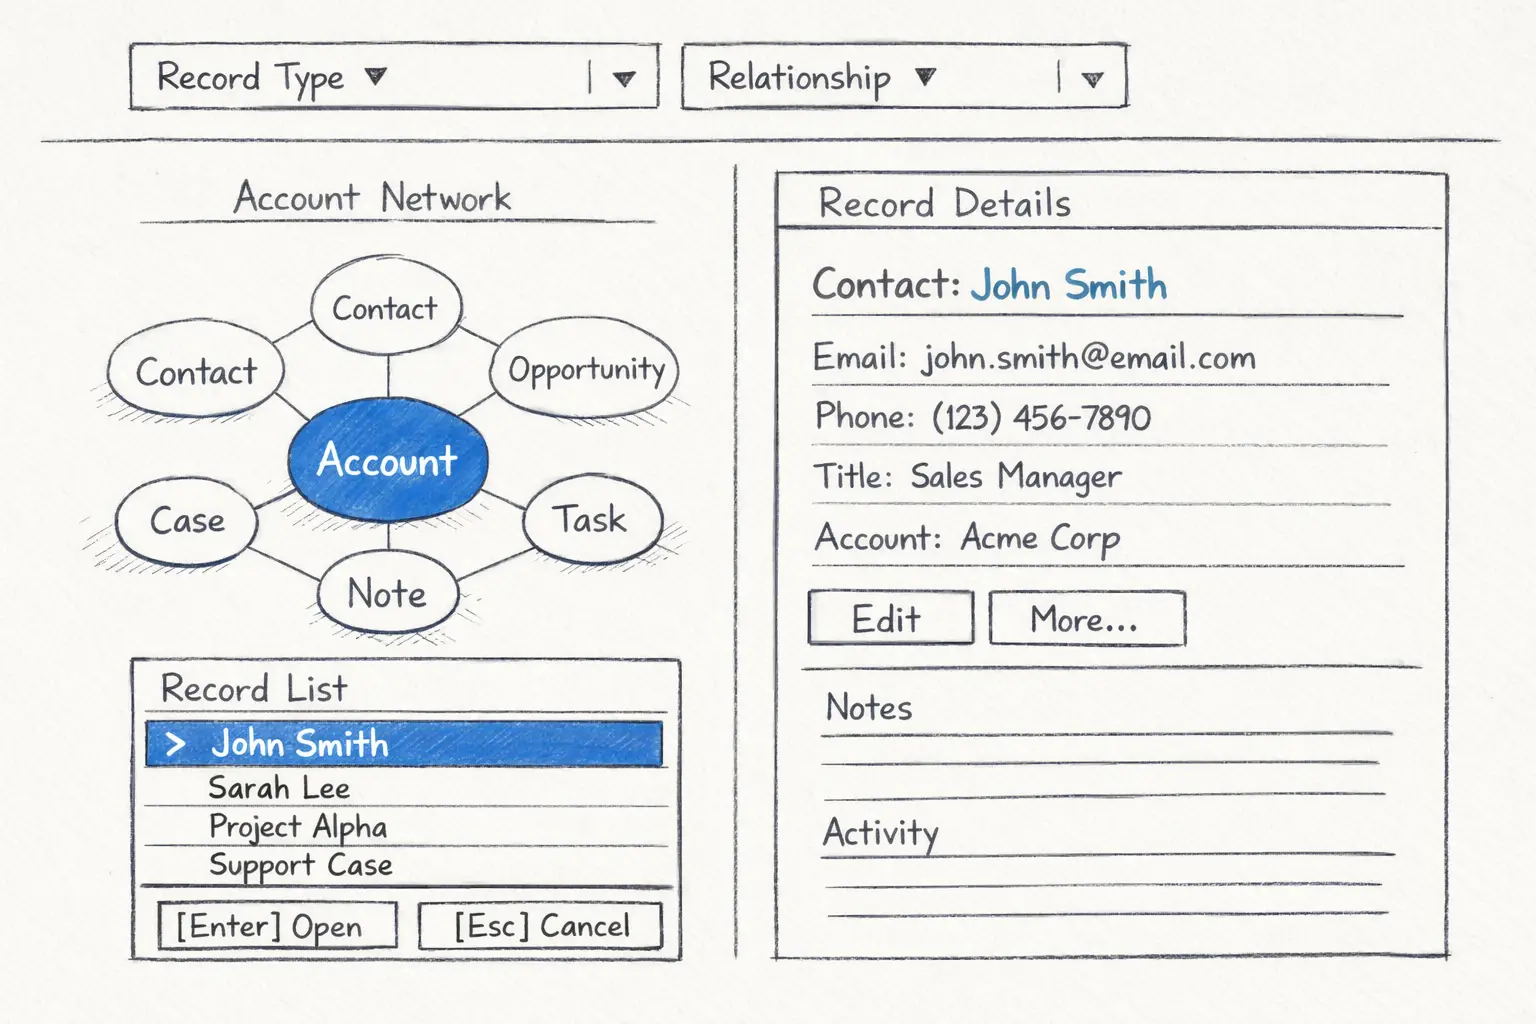
The renderer now receives plain graph data and does not need to know what a UI API edge is. It can focus on graph interaction, selected-record details, and a readable summary of the current page. The same GraphData object also supports a semantic record list for people who cannot or do not want to use the canvas:
import { useState } from 'react';
import ForceGraph2D from 'react-force-graph-2d';
import type {
  LinkObject,
  NodeObject,
} from 'react-force-graph-2d';
import type {
  GraphData,
  GraphLink,
  GraphNode,
} from './graphModel';

interface AccountKnowledgeGraphProps {
  graph: GraphData;
}

export function AccountKnowledgeGraph({
  graph,
}: AccountKnowledgeGraphProps) {
  const [selected, setSelected] = useState<GraphNode | null>(null);
  const account = graph.nodes.find(node => node.type === 'Account');

  return (
    <section aria-labelledby="graph-title">
      <h2 id="graph-title">Account relationship graph</h2>
      <p>
        Showing {graph.summary.displayedContacts} of{' '}
        {graph.summary.totalContacts} Contacts
        {graph.summary.hasMoreContacts
          ? '. More Contacts are available.'
          : '.'}
      </p>

      <div className="graph-canvas" aria-hidden="true">
        <ForceGraph2D
          graphData={graph}
          width={800}
          height={500}
          nodeId="id"
          nodeLabel={(node: NodeObject<GraphNode>) =>
            `${node.label} (${node.type})`
          }
          nodeAutoColorBy="type"
          linkLabel={(link: LinkObject<GraphNode, GraphLink>) =>
            link.type
          }
          linkDirectionalArrowLength={5}
          linkDirectionalArrowRelPos={1}
          onNodeClick={(node: NodeObject<GraphNode>) =>
            setSelected(node)
          }
        />
      </div>

      {selected && (
        <aside aria-live="polite">
          <h3>{selected.label}</h3>
          <p>{selected.type}</p>
          <dl>
            {Object.entries(selected.properties).map(([key, value]) => (
              <div key={key}>
                <dt>{key}</dt>
                <dd>{value ?? 'Not available'}</dd>
              </div>
            ))}
          </dl>
        </aside>
      )}

      <h3>Accessible record list</h3>
      <ul>
        {graph.nodes.map(node => (
          <li key={node.id}>
            <button type="button" onClick={() => setSelected(node)}>
              {node.label} — {node.type}
              {node.type === 'Contact' && account
                ? `; contact for ${account.label}`
                : ''}
            </button>
          </li>
        ))}
      </ul>
    </section>
  );
}
The list after the canvas is not decorative. Canvas-based graphs are difficult for screen readers and keyboard-only users, so the canvas is hidden from the accessibility tree and the list exposes the same records, relationships, and selection action. A production app should also include filters, visible focus states, and a skip link between the controls and the graph.
The example deliberately stops after the first page. To add a Load more action, keep pageInfo.endCursor in the page component, pass it back as the query's after variable, and merge the next page through the same adapter. Salesforce's recipes include a complete cursor-pagination example.
The library defaults to the browser window's dimensions, not its parent element's dimensions. This basic example passes an explicit 800×500 canvas size and lets a narrow container scroll. For a responsive production layout, measure the container with ResizeObserver and pass the measured width to ForceGraph2D.
.graph-canvas {
  max-width: 100%;
  overflow-x: auto;
  border: 1px solid #c9c9c9;
}
Keep the graph useful as the data grows
Performance work starts by limiting how much data reaches the canvas. Salesforce GraphQL record queries have documented limits: a query can contain up to 10 subqueries, each subquery counts toward rate limiting, and each can return up to 2,000 records. The browser will become unpleasant long before “load 2,000 of everything” becomes a good user experience. Review the current GraphQL query limits while designing the data shape.
A production graph should reveal a useful neighborhood rather than the entire data model. Load a bounded first page, then let filters and deliberate expansion actions control what appears next. The following practices keep that behavior predictable as the use case grows:
- Load a bounded first neighborhood around a selected record.
- Keep the Contact count small, then add filters before introducing more object types.
- Expand a node only when the user asks for more context.
- Cache normalized nodes by record ID.
- Preserve positions for nodes already on screen.
- Cancel or ignore stale requests when the user changes the root record.
- Show how many related records were omitted or are available to load.
- Keep renderer state, such as
x,y, velocity, and selection, out of the Salesforce data model.
There is no universal node-count threshold that makes one renderer the right choice. Benchmark with representative data. Sigma.js is designed for larger WebGL-rendered graphs, while Cytoscape.js is a strong option when the app needs traversal, PageRank, compound nodes, or advanced layout control.
Do not make the library decision from a screenshot. Test the slowest supported laptop, long labels, touch input, keyboard navigation, and the ugliest real customer hierarchy you can find. Those tests reveal rendering and interaction costs that a clean sample dataset will hide.
Security and data quality are part of the graph
Because a graph exposes relationships more clearly than a related list, permission and data-quality mistakes are especially visible. Treat access control, missing fields, label safety, and keyboard access as part of the graph design rather than cleanup work after rendering. Keep these rules close to the implementation:
- Query through the Data SDK. It handles Salesforce authentication and CSRF concerns. Do not send session credentials to a third-party graph service from the browser.
- Request only the fields the view needs. A tooltip does not need an entire Contact record.
- Treat missing data honestly. “Not available” may mean absent, null, unsupported, or inaccessible. Do not turn it into a false business conclusion.
- Never use record names as stable identifiers. Names change and are not unique. Use record IDs.
- Do not render untrusted values as HTML. Text labels should remain text. Avoid
dangerouslySetInnerHTMLin tooltips and detail panels. - Review dependency licenses and updates. Open source still needs an ownership and maintenance plan.
- Provide a non-visual path. Every important graph action needs a keyboard and screen-reader equivalent.
Salesforce's validation MCP tools are also available for Multi-Framework apps. At the time of writing, this validation workflow is a Developer Preview, so treat it as useful development feedback rather than a GA deployment requirement. It can complement the permission and accessibility checks above, but it does not replace testing with the users and data shapes the app will actually encounter.
When GraphQL is not enough
The Account-neighborhood query works because the required relationships are available through UI API GraphQL. A client-side query stops being enough when an edge must be inferred, scored, aggregated, or assembled from data outside the supported UI API schema. Common reasons to introduce a server-side layer include:
- An inferred relationship such as “likely decision maker”
- A traversal across objects not supported by UI API
- Aggregated or scored edges
- Data from an external system
- A server-side rule that should not be exposed to the client
In those cases, put the logic behind Apex REST and call it with dataSdk.fetch?.(). The Data SDK documentation explicitly recommends its fetch wrapper for Apex REST and other supported Salesforce REST endpoints. Return a purpose-built DTO containing only the nodes, links, and properties the user is allowed to see.
Keep the same GraphData interface on the React side. Whether the adapter receives GraphQL records or an Apex DTO, the renderer should still consume { nodes, links }. That separation lets you change the retrieval strategy without rewriting the graph.
For external graph engines or graph databases, use Salesforce integration patterns appropriate to the data sensitivity and freshness requirement. Avoid sending CRM data to a new store merely because the visualization library uses the word “graph.” A browser renderer needs nodes and edges; it does not require a graph database.
Build and deploy
Before deployment, run the bundle's automated tests and production build. The tests should catch adapter and component regressions, while the build confirms that the final assets can be packaged. Run both commands from the UI-bundle directory:
npm test
npm run build
The reactbasic UI-bundle template gives you the React bundle. An internal App Launcher app also needs Salesforce metadata that connects the bundle to a CustomApplication. Salesforce documents that relationship in Integrate Your React App with the Headless 360 Platform.
The generated bundle already contains accountKnowledgeGraph.uibundle-meta.xml. Preserve any template-supplied values that your project needs, but make the internal-app target explicit. A minimal version looks like this:
<?xml version="1.0" encoding="UTF-8"?>
<UIBundle xmlns="http://soap.sforce.com/2006/04/metadata">
  <masterLabel>Account Knowledge Graph</masterLabel>
  <description>Explore Account and Contact relationships.</description>
  <isActive>true</isActive>
  <version>1</version>
  <target>CustomApplication</target>
</UIBundle>
The UI bundle can be deployed without automatically becoming visible in the App Launcher. A CustomApplication supplies that connection and references the bundle by its fully qualified name, c__accountKnowledgeGraph. Create it at force-app/main/default/applications/accountKnowledgeGraph.app-meta.xml:
<?xml version="1.0" encoding="UTF-8"?>
<CustomApplication xmlns="http://soap.sforce.com/2006/04/metadata">
  <formFactors>Small</formFactors>
  <formFactors>Large</formFactors>
  <isNavAutoTempTabsDisabled>false</isNavAutoTempTabsDisabled>
  <isNavPersonalizationDisabled>false</isNavPersonalizationDisabled>
  <isNavTabPersistenceDisabled>false</isNavTabPersistenceDisabled>
  <isOmniPinnedViewEnabled>false</isOmniPinnedViewEnabled>
  <label>Account Knowledge Graph</label>
  <navType>Standard</navType>
  <uiBundle>c__accountKnowledgeGraph</uiBundle>
  <uiType>Lightning</uiType>
</CustomApplication>
Application metadata defines the app, but it does not decide which users can open it. A permission set is a clean way to grant that visibility without changing a broad profile. Create force-app/main/default/permissionsets/Account_Knowledge_Graph.permissionset-meta.xml with the application's developer name:
<?xml version="1.0" encoding="UTF-8"?>
<PermissionSet xmlns="http://soap.sforce.com/2006/04/metadata">
  <applicationVisibilities>
    <application>accountKnowledgeGraph</application>
    <visible>true</visible>
  </applicationVisibilities>
  <label>Account Knowledge Graph</label>
</PermissionSet>
That permission set grants app visibility only. Users still need appropriate Account and Contact object, field, and record access through their profiles or other permission sets. Record sharing remains relevant as well, because the graph should reveal only the neighborhood the current user can access.
Return to the Salesforce DX project root before deploying. Target the same graph-dev alias used by the local development server so the metadata and the tested data context stay aligned. The standard project deploy command sends the UI bundle, compiled assets, application, and permission set:
sf project deploy start --target-org graph-devDeployment makes the metadata available, but the test user still needs application visibility. Assign the new permission set to the current user in graph-dev. Then open the org so the app can be launched and checked:
sf org assign permset \
  --name Account_Knowledge_Graph \
  --target-org graph-dev

sf org open --target-org graph-dev
Launch the app from the App Launcher and test as a normal business user, not only as an administrator. Permission-sensitive GraphQL queries can behave differently, and that difference is part of the product. Repeat the check with the lowest-access user persona that is expected to use the graph.
A practical production checklist
Before calling the graph finished, check the full path from business question to authorized data and accessible interaction. A graph can render correctly while still carrying vague edge semantics, hiding partial results, or excluding keyboard users. Use this list as the release gate:
- The graph answers a specific business question.
- Every node has a stable Salesforce record ID.
- Every edge has a clear business meaning.
- Queries are bounded, filterable, and pageable.
- Data access uses
@salesforce/platform-sdk/data, not raw Salesforce API calls. - Restricted or missing fields do not crash the adapter.
- GraphQL errors and empty results have visible states.
- The renderer can be replaced without rewriting data access.
- Selection is available from both the canvas and a semantic list.
- Tooltips and labels render values as text.
- Tests cover duplicate nodes, null relationships, partial data, and large neighborhoods.
- The app is verified with a non-admin permission set.
The checklist is deliberately broader than visual polish. Most expensive graph problems begin at the data or permission boundary and only become obvious on the canvas. A release review should therefore include a Salesforce administrator, a developer, and someone who understands the business meaning of each relationship.
Where to go next
The small Account-to-Contact graph proves the complete path: Salesforce query, adapter, React state, visualization, and accessible fallback. That is enough for a useful first release. It also gives the team a stable baseline for measuring whether each new relationship improves the user's understanding or merely adds noise.
If users find it helpful, add one relationship at a time. Opportunities could show the work connected to the Account. Cases could show where support pressure is building. A click-to-expand action could reveal a second neighborhood without loading the whole CRM into the browser.
Only persist new edges when the business meaning, owner, update process, and access model are clear. Use Apex or an external graph engine when the relationships require server-side scoring, unsupported traversals, or data outside Salesforce. A visual graph alone does not require a second database.
Multi-Framework does not replace LWC, and a graph is not the right interface for every record page. It gives Salesforce teams a practical React option when an experience genuinely benefits from the React ecosystem. Start with one Account, make the result trustworthy, and expand only when the next relationship answers a real question.
Further reading
These sources cover the platform pieces and open-source libraries used in the implementation. Begin with the Salesforce release notes and Multi-Framework guide when checking availability or project structure, then use the Data SDK and GraphQL guides while building the query layer. The library documentation becomes most useful after the graph's business boundary and data contract are settled.
- Develop React Apps with Salesforce Multi-Framework — Generally Available
- Get Record Data in Your React Apps with Data SDK and GraphQL — Generally Available
- Salesforce Multi-Framework Developer Guide
- Integrate Your React App with the Headless 360 Platform
- Work with Data SDK
- Use GraphQL to Query Records
- Salesforce GraphQL API Developer Guide
- Salesforce Multi-Framework Recipes
- react-force-graph
- Cytoscape.js
- Sigma.js