

Salesforce provides a robust REST API that enables seamless integration between the Salesforce platform and external systems. This guide covers everything from the basics of the Salesforce REST API to advanced topics like OAuth 2.0 authentication flows, performing CRUD operations, using Postman for testing, external integration considerations, Apex callouts, security best practices, and troubleshooting. It is structured for both beginners and experienced developers, with clear examples and illustrations.
Overview of Salesforce REST API
What is the Salesforce REST API?
The Salesforce REST API is a simple yet powerful web service interface that exposes Salesforce data and functionality via HTTP endpoints. It follows RESTful principles, using standard HTTP methods (GET, POST, PATCH, DELETE) and supports data formats like JSON and XML. This API allows you to create, read, update, and delete (CRUD) records in Salesforce, execute queries (SOQL) and searches (SOSL), retrieve object metadata, and even access information about your org’s API limits. Because it uses HTTP and standard formats, the REST API is language-agnostic – any technology that can make web requests can integrate with Salesforce.
When and why to use REST API?
REST API is ideal for building integrations with external applications or services and for developing mobile or web apps that need to interact with Salesforce data. Its advantages include simplicity (no complex SOAP envelope or WSDL needed), flexibility, and broad support across programming environments. For example, you might use the REST API to sync customer data between Salesforce and an ERP system in real-time, to build a custom web portal that shows Salesforce data to customers, or to power a mobile app that needs to create and fetch records from Salesforce. In summary, use the REST API when you need a straightforward, stateless integration mechanism to work with Salesforce data over HTTP.
REST API endpoints structure: All REST API endpoints are relative to your Salesforce instance and have the base path /services/data/<version>/. For example:
/services/data/v57.0/sobjects/Account/– endpoint for Account objects (used to create records with POST, retrieve with GET by adding an ID, etc.)./services/data/v57.0/query/?q=SELECT+Name+FROM+Account– SOQL query endpoint./services/data/v57.0/search/?q=FIND+%7BACME%7D– SOSL search endpoint (FIND {ACME}).
The <version> corresponds to the API version. Using a fixed version in your integration ensures stability (API changes are versioned). Always check the latest Salesforce API version for new features, but test before upgrading versions in an existing integration to handle any subtle changes.
Authentication with OAuth 2.0
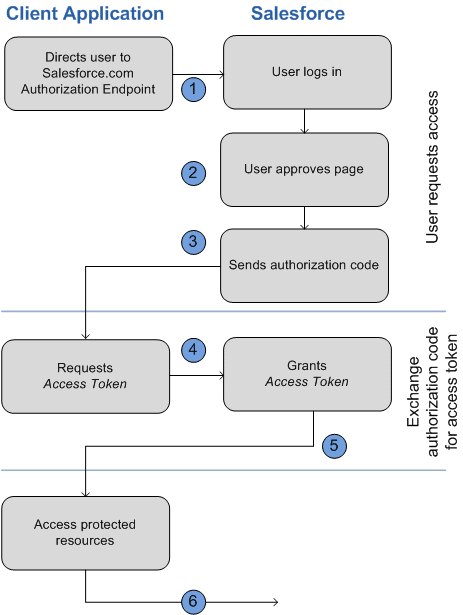
To protect data, Salesforce requires authentication for API access. You cannot call the REST API anonymously. The most common and secure approach is to use OAuth 2.0, an open standard protocol for authorization. In Salesforce, OAuth 2.0 allows external applications to obtain a limited-access token to act on behalf of a user or as an integration user – without exposing user credentials. Salesforce’s OAuth implementation ensures that only authorized apps and users can access data, acting like a security guard that checks identities and permissions.
Connected App: To integrate via OAuth, you must create a Connected App in Salesforce. A Connected App defines the external application’s OAuth settings (like a Consumer Key (Client ID) and Consumer Secret for the app, callback URL, and permitted scopes). In Setup > App Manager, you create a new Connected App, enable OAuth settings, set a callback URL (a destination URL where Salesforce will send the user after they authorize the app), and select OAuth scopes (e.g., “Full access (full)”, “API (api)”, “Refresh token” etc. depending on what the integration needs). Once set up, Salesforce will generate a consumer key and secret for your app.
OAuth 2.0 flows: Salesforce supports several OAuth 2.0 authorization flows – each suited for different scenarios:
- Web Server Flow (Authorization Code Grant): For web applications that can securely store the client secret on a server. The user is redirected to Salesforce login to authorize, and an authorization code is returned to the web server, which then exchanges it for an access token. This flow is the most common for web integrations and offers refresh tokens for long-term access.
- User-Agent Flow (Implicit Grant): For pure front-end or mobile apps (that cannot hide a secret). The user is redirected to login and, upon authorization, Salesforce directly responds with an access token in the URL fragment (no code exchange). This flow is simpler but does not issue a refresh token (short-lived access). (Note: These days, Salesforce recommends using the Web Server flow with PKCE for mobile/SPAs instead of implicit).
- JWT Bearer Token Flow: For server-to-server integrations without user interaction. The external service holds a certificate and uses a signed JWT assertion to request an access token directly (no interactive login). This requires a Connected App configured to trust a certificate and is ideal for backend integrations (the token is obtained using the app’s credentials, on behalf of a specific user or integration user).
- Username–Password Flow: A legacy flow where the integration supplies a Salesforce username, password, and the client credentials to get a token. This does not require interactive user approval (no redirect), but it’s not recommended for production use because it involves storing a user’s credentials. It’s mostly used for quick tests or scripts.
- Device Flow: For integrations on devices with limited UI (IoT, consoles). The device gets a code that the user must approve via a separate browser or device. Once approved, the device receives an access token.
- Client Credentials Flow: A newer addition for machine-to-machine integration where no user is involved. The client (with client ID/secret) directly obtains an access token for itself (this must be enabled on the Connected App and is used in specific scenarios where a default integration user context is acceptable).
Access and Refresh Tokens: Successful OAuth authentication yields an Access Token – a session token that must be included in API calls (usually in the HTTP header as Authorization: Bearer <token>). Access tokens are short-lived (typically valid for 12 hours by default). If the app needs continued access, it should also obtain a Refresh Token (by requesting the scope “refresh_token” in flows that support it, like Web Server flow). A refresh token can be stored securely by the app and used to get a new access token when the old one expires, avoiding requiring the user to log in again. Not all OAuth flows issue refresh tokens (for example, the implicit flow does not), but when available they are very handy for long-lived integrations. The Connected App can be configured with policies for how long refresh tokens remain valid or if they expire after a period of inactivity.
Token management: The application should safely store the access token (and refresh token if applicable). Never expose these tokens in logs or error messages. If a token is compromised or if a user revokes access, the token can be revoked via Salesforce’s token revocation endpoint or by an admin via the user’s detail page in Salesforce. After revocation or expiry, the app will receive a 401: Unauthorized error for API calls, at which point it should re-authenticate (using a refresh token or re-initiate the OAuth flow for the user).
In practice, OAuth 2.0 means users or integration admins grant your connected app specific access to Salesforce data. This mechanism ensures secure, token-based access instead of handling raw passwords. When setting up OAuth, be sure to define appropriate scopes – least privilege principle (for example, if your integration only needs to perform API calls, use the “api” scope instead of full access). Also consider IP range restrictions in the Connected App and high assurance settings for extra security (we will cover more in security best practices).
Core REST API Operations: CRUD, Queries, Composite, and Limits
Once authenticated, your application can use the access token to perform various operations through REST API endpoints. Below are the core operations and how to use them:
- Create a record (POST): Use a POST request to the specific sObject URI. For example, to create a new Account record, POST to:
/services/data/v57.0/sobjects/Account/
with a JSON body containing the field values, e.g.{"Name": "Acme Inc", "Phone": "1234567890"}. If successful, Salesforce will respond with HTTP 201 Created and a JSON containing the new record’s Id. - Retrieve a record (GET): Use a GET request to the sObject URI with an ID. For example:
GET /services/data/v57.0/sobjects/Account/001XXXXXXXXXXXX
This returns the field data for that Account in JSON (or XML if requested). You can also GET sub-resources, e.g./sobjects/Account/001.../describeto get metadata about the Account object. - Update a record (PATCH): Use a PATCH request on the record’s URI. For example:
PATCH /services/data/v57.0/sobjects/Account/001XXXXXXXXXXXX
with a JSON body of fields to update, e.g.{"Phone": "0987654321"}. Salesforce will return a 204 No Content if the update succeeds (or 200 OK with an optional response depending on preferences). (If the client or library doesn’t support PATCH, a POST with?_HttpMethod=PATCHcan be used as a workaround.) - Delete a record (DELETE): Use a DELETE request on the record’s URI:
DELETE /services/data/v57.0/sobjects/Account/001XXXXXXXXXXXX.
On success, Salesforce returns 204 No Content. After deletion, that record ID will no longer be queryable.
These four cover the basic CRUD operations on any Salesforce object (standard or custom). The REST API is flexible – it supports both JSON (default) and XML formats in requests and responses (JSON is more commonly used).
- Query records (SOQL): Use GET with the Query resource. For example:
GET /services/data/v57.0/query/?q=SELECT+Id,+Name+FROM+Account+WHERE+Industry='Energy'
This executes a SOQL query. The response includes a JSON with fields:totalSize,done(if there are more records or not), and an arrayrecordsof results. Ifdoneis false (meaning there are more than 2000 records by default), anextRecordsUrlis provided to retrieve the next batch. You can then GET that URL to continue retrieving additional records. - Search records (SOSL): Use GET with the Search resource. For example:
GET /services/data/v57.0/search/?q=FIND+%7BAcme%7D
(where the SOSL queryFIND {Acme}is URL-encoded). SOSL allows you to search across multiple objects and fields in one query. The response will include an array of search results (could be different object types) matching the keywords. SOSL is useful for keyword searches, whereas SOQL is for structured queries. - Describe and metadata: You can retrieve information about object metadata via endpoints like
GET /services/data/v57.0/sobjects/Account/describe(describe fields, record type info, etc. for Account) orGET /services/data/v57.0/sobjects/(list all objects available). There are also endpoints for discovering available API resources, API versions, etc. (for example,GET /services/data/lists available versions). - Composite requests: Salesforce’s REST API provides composite resources that allow you to execute multiple operations in a single HTTP request. This can reduce the number of round trips between your client and Salesforce and make complex, multi-step operations easier and atomic. The main composite APIs include: Composite (sometimes called Composite Batch) and Composite Graph, and related capabilities like sObject Collections.
- Composite (Batch) Requests: By calling
/services/data/v57.0/composite/batch, you can send in one HTTP POST a batch of sub-requests (up to 25 subrequests in one call). Each subrequest is essentially a REST API call (could be query, get, create, etc.). Salesforce will process them and return one combined response that contains the result of each subrequest. Subrequests are independent by default (all or nothing behavior can be controlled with flags in some composite APIs). Note that each subrequest in a composite batch counts against your API rate limits individually, even though they are submitted together. Also, subrequests in a batch cannot refer to each other (no passing data between them). They execute serially in the order given, and you get a consolidated response. This is useful for reducing network overhead or grouping logically related calls. - Composite (Tree & Subrequest) Requests: The
/services/data/v57.0/compositeendpoint (without “batch”) allows for more advanced scenarios, including referencing results of earlier subrequests in later ones. For example, you can create an Account and then a Contact in one request, where the Contact’sAccountIdis the result of the Account creation (using reference IDs). This Composite request also supports anallOrNoneflag to roll back all changes if any subrequest fails. It similarly supports up to 25 subrequests in one call. For instance, a composite request can first do a SOQL query, then use an ID from that query in a subsequent subrequest to update a record, all in one round trip. The response returns an array of compositeResponse elements with each subresponse. - sObject Collections: There are also REST resources for creating or updating collections of records in one go (e.g.,
POST /v57.0/composite/sobjectsto create a set of records of the same type, up to 200 records at once). This is a bit different from the generic composite, but it’s a convenience for bulk creates/updates without using the Bulk API. - Composite Graph: Introduced in later API versions, Composite Graph allows for even more complex, multi-branch request graphs. It’s a way to perform multiple composite-like operations with branching logic and dependencies. This is an advanced use case where multiple related operations are orchestrated in a single payload (mostly beyond the scope of this beginner-to-intermediate guide, but worth noting if you encounter complex transactions).
- Composite (Batch) Requests: By calling
- API Limits: Salesforce enforces daily API call limits for each org to protect performance. The limit is typically a rolling 24-hour total of API requests. The exact number depends on your Salesforce edition and the number of user licenses. For example, an Enterprise Edition org starts with a base of 100,000 calls per 24 hours, plus an additional 1,000 calls for each Salesforce user license (e.g., 15 users gives 115,000 calls/day). Developer Edition and trial orgs have a limit of 15,000 calls per 24 hours. You can check your org’s API usage in Salesforce Setup (under System Overview or by querying
/services/data/v57.0/limitswhich returns current usage). If an API call is made after the org has exhausted its limit, Salesforce will return an error (HTTP 403 Forbidden with error codeREQUEST_LIMIT_EXCEEDED). Each REST request counts against this limit, except some specific unaffected calls. Note that in a composite batch, each subrequest counts as an individual call towards the limit. There are also concurrent request limits and payload size limits (e.g., a single REST request payload can be up to ~6MB of JSON, and returned data up to 15MB for synchronous requests). For very large data loads or extracts (thousands of records), consider using the Bulk API instead of making a huge number of REST requests.
Handling API versions: The REST API version (e.g., “v57.0”) determines the features and objects available. Salesforce typically supports a version for several years. When you build an integration, decide whether to lock to a specific version (to maintain stability) or periodically update the version to use new features. Always test after changing the version in your endpoints, as there could be minor differences (for example, new required fields or changed error messages). Salesforce’s backward compatibility is good, but not guaranteed across all versions.
Testing Salesforce REST APIs with Postman
Postman is a popular tool for exploring and testing APIs. You can use Postman to verify your Salesforce API integration calls, experiment with queries, and debug issues. Here’s how to get started with Salesforce REST API in Postman:
- Connected App & OAuth Setup: Before using Postman, ensure you have a Salesforce Connected App (with OAuth enabled) as described in the Authentication section. For testing, you might use a Developer Edition org where you can create a connected app and use its Consumer Key/Secret. In the Connected App, add the OAuth callback URL that Postman will use. Postman provides a generic callback URL for OAuth (such as
https://oauth.pstmn.io/v1/browser-callback) which you can use in your Connected App’s OAuth settings. Make sure the scopes include at leastapi(andrefresh_tokenif you want a refresh token). - Configure Postman OAuth 2.0: In Postman, create a new Collection (e.g., “Salesforce API Test”). Open the Authorization tab for the collection (so that all requests in it can inherit these auth settings). Choose OAuth 2.0 as the type. Postman will show fields to enter OAuth details (Grant Type, Auth URL, Access Token URL, Client ID, Client Secret, Scope, Callback URL, etc.). Fill these as follows:
- Grant Type: Select “Authorization Code” for the standard web server flow (or “JWT Bearer” if you are using the JWT flow, or “Password Credentials” for username-password flow – though Authorization Code is most common). (In the Postman screenshot below, “Implicit” is shown, but typically “Authorization Code” is used for web server flow.)
- Auth URL:
https://login.salesforce.com/services/oauth2/authorize(Usehttps://test.salesforce.com/...for sandbox orgs). - Access Token URL:
https://login.salesforce.com/services/oauth2/token - Client ID: (Consumer Key from your Connected App)
- Client Secret: (Consumer Secret from your Connected App)
- Scope: e.g.
api refresh_token(space-separated scopes your app needs). - Callback URL: (Use the same callback URL you configured in the Connected App, e.g., Postman’s callback
https://oauth.pstmn.io/v1/browser-callback).
- Obtain Access Token: After configuration, click the “Get New Access Token” button in Postman. Postman will open a new browser window prompting you to log in to Salesforce (and ask for authorization for your connected app if not already granted). After you login and authorize, Salesforce will redirect to the callback URL. Postman captures this redirect and extracts the access token. You should then see in Postman a dialog with the Access Token and other details. Click “Use Token” to set it for the collection. Now Postman will include the
Authorization: Bearer <token>header automatically in your requests.- Tip: Postman can also handle the refresh token automatically (there’s a setting “Auto-refresh token” which can use the refresh token to fetch a new access token when the current one expires). This is handy for long-running testing sessions.
- Set up environment (optional): It’s useful to set Postman variables for your Salesforce instance URL and API version. For example, after obtaining the token, Postman might show an “instance_url” (e.g.,
https://yourInstance.salesforce.com). Copy this to a collection (or global) variable in Postman, sayinstance_url, and also set aapi_versionvariable likev57.0. Then you can compose requests using these variables, e.g.{{instance_url}}/services/data/{{api_version}}/sobjects/Account. This way, if you switch orgs or versions, you just update the variables. In the ApexHours example, they set variables_endPointandversionfor this purpose. - Make API calls in Postman: Now you can add requests in the collection. For example, to query accounts, create a GET request to
{{instance_url}}/services/data/{{api_version}}/query?q=SELECT+Name+FROM+Account+LIMIT+5. Hit Send – you should get a response with some Account records. You can try other calls: create an account by POSTing to/sobjects/Account, delete by DELETE, etc. Postman will use the bearer token in the header since you attached it to the collection. If the token expires, you can regenerate via the OAuth 2.0 tab.
Postman collections are also available publicly. Salesforce provides a official Postman collection of pre-built requests for various Salesforce APIs. You can find this on the Postman API network (for example, a “Salesforce Platform APIs” collection) and fork it to your workspace. This collection contains templates for many requests (CRUD, queries, etc.) that you can just fill in with your variables and use. It’s a great way to explore APIs without crafting every request from scratch.
Example: Suppose you want to test creating a Contact via REST. In Postman:
- You would choose POST and the URL:
{{instance_url}}/services/data/{{api_version}}/sobjects/Contact. - In the body (choose raw JSON), you’d put for example:
{"LastName": "Doe", "FirstName": "John", "Email": "john.doe@example.com"}. - Send the request. If everything is set up, you get a
201 Createdwith a JSON response containing the new Contact Id. If there’s an error (e.g., required field missing), you’ll get a 400 with a useful message in the response.
Using Postman to test your calls helps isolate issues. If your application code isn’t working, but the same call works in Postman, you know the issue is likely in your code (or how it’s handling auth). If it fails in Postman too, it could be an issue with the Salesforce side or your request formation.
Troubleshooting in Postman: Common issues when first setting up include:
- Getting a
invalid_client_idorinvalid_clienterror: means the client ID/secret or URLs are wrong – double-check those. - Getting
unsupported_grant_type: ensure you selected the correct grant (and that the connected app is configured to allow that flow). - Getting
invalid_grant(after login attempt): often means the user hasn’t authorized the app or there’s a connected app policy blocking it (e.g., “user not approved for access” if the app is set to Admin pre-approve and your user isn’t whitelisted). - Postman not capturing the token redirect: check that your callback URL in Salesforce matches exactly what Postman is using, and that you clicked “Use Token” to apply it.
Integrating Salesforce with External Systems (ERP, Third-Party Services)
One of the main uses of the Salesforce REST API is to connect Salesforce with other enterprise systems such as ERPs, data warehouses, e-commerce platforms, marketing automation, or custom applications. A well-implemented integration allows data to flow between Salesforce and these systems, keeping information in sync and automating processes across platforms.
Data flow considerations: Integration can be one-way (e.g., Salesforce pushes updates to an ERP) or bi-directional (both systems exchange data). You should clearly define which system is the source of truth for each data element to avoid conflicts. For example, an ERP might be the master for Order information, while Salesforce is master for Lead and Opportunity data. Use the REST API for real-time or near-real-time integration needs. For bulk nightly syncs of large data volumes, consider using Bulk API or scheduled ETL jobs.
API Versioning: When integrating, choose an API version and stick to it for that integration channel. Salesforce’s REST endpoints include the version number, which means you control when to upgrade. If Salesforce introduces a new version with changes you need, test thoroughly before moving your integration to that version. Generally, backward compatibility is good, but behavior can change (for instance, API v55.0 might allow something that in v57.0 is slightly different or returns more data). Keep an eye on Salesforce release notes for API changes if you plan to upgrade versions periodically.
Rate limiting and usage patterns: External systems should be built with awareness of Salesforce’s rate limits. If you have an integration that potentially makes a high volume of calls, implement throttling on your side. For instance, if syncing a large batch of records, don’t make API calls in a tight loop without delay – you might hit concurrency or total call limits quickly. A common approach is to implement an exponential backoff: if Salesforce responds with a REQUEST_LIMIT_EXCEEDED error, pause or slow down requests and retry after some time. Also, monitor the Salesforce Limits API or use the usage data in Salesforce to know how close you are to the limit. If an integration regularly hits 80%+ of daily limits, consider requesting a higher limit from Salesforce (available for purchase) or optimize the calls (combine calls using composite, filter queries to retrieve only needed fields, etc.).
Retries and error handling: Network issues or transient errors can happen. Your integration should handle scenarios like a timeout or a 5xx server error from Salesforce by retrying the operation after a brief delay. However, be careful with retries on write operations to avoid duplicates – design your operations to be idempotent when possible. For example, if you’re creating a record via REST, and you get a timeout after sending the request, you don’t know if Salesforce actually created the record or not. In such cases, you might implement an UPSERT pattern (update or insert by an external ID) or check for existence before retrying create, to avoid creating a duplicate record.
Integrating with third-party services: Often, Salesforce is just one part of a larger ecosystem. You might use middleware like MuleSoft, Boomi, or Zapier to facilitate integration. These tools can orchestrate flows and handle retries, mappings, etc., using Salesforce REST (or Bulk) APIs under the hood. If integrating directly without middleware, make sure your external system’s code is robust in managing API sessions and errors. Use logging to track integration operations, so that if something goes wrong (like a series of records failed to sync), you can diagnose it.
Handling connectivity issues: External systems should expect occasional downtime or errors. If Salesforce is down for maintenance (rare, but during a maintenance window API might be read-only or unavailable), the integration should fail gracefully and retry later. Similarly, if the external system is down, Salesforce might queue outbound calls (if using outbound messages or platform events) or simply encounter errors if Apex callouts fail. Use a retry mechanism or a dead-letter queue for messages that could not be delivered, to not lose critical data.
Use of Middleware vs. Direct Integration: For complex multi-step integrations or transformations, middleware can offload a lot of custom code. But if you go direct, keep the integration logic separated and modular. For example, write a dedicated integration module or microservice that handles Salesforce interactions, so that other parts of your system can call it without duplicating the Salesforce connection logic.
API-enabled integration user: A best practice is to create a dedicated Salesforce user account for integrations (with an appropriate profile or permission set that grants API Enabled and needed object permissions). This way, all changes made via the integration can be tracked under that user’s name in audit logs, and you can easily adjust its permissions without affecting real human users. You can also set login IP restrictions or use profiles to restrict where this user can log in from (for instance, only the IP address of your server), adding another layer of security.
In summary, integrating with external systems via the Salesforce REST API requires thoughtful design around data flow, error handling, and governance (limits and security). Done correctly, it can greatly enhance business processes – for example, ensuring your sales team in Salesforce and your finance team in an ERP are always looking at the same, up-to-date data in their respective systems.
Calling External APIs from Salesforce (Apex Callouts)
Integration is often bidirectional. In addition to external systems calling Salesforce’s API, Salesforce can call out to external REST APIs. This is done via Apex callouts – using Apex code to perform HTTP requests to external endpoints. This is useful when you want to grab data from an external service in real-time (e.g., call an address verification API when a record is saved) or send data out (e.g., notify a third-party system when something happens in Salesforce).
Apex callout basics: Apex has an Http class for making HTTP requests. To do a callout, your Apex code (could be in a trigger, a batch job, or a controller) will instantiate an HttpRequest, set the endpoint URL, method (GET, POST, etc.), headers, and body as needed, then send it using an Http instance. The response comes back as an HttpResponse object which you can inspect for status code and body.
Before an Apex callout can reach an external URL, that domain must be added to Remote Site Settings (in Setup) or configured as a Named Credential (a preferred, more secure method). This is a safety feature that prevents Salesforce from accidentally calling unknown URLs. So, if you plan to call https://api.example.com, you need to add https://api.example.com as a Remote Site or create a Named Credential for it.
Example Apex callout (simplified):
// Make a GET request to an external REST API
Http http = new Http();
HttpRequest req = new HttpRequest();
req.setEndpoint('https://api.example.com/data');  // target URL
req.setMethod('GET');
req.setHeader('Authorization', 'Bearer <token>'); // if auth needed
HttpResponse res = http.send(req);
if(res.getStatusCode() == 200) {
    String responseBody = res.getBody();
    // Parse JSON (for example, using JSON.deserialize)
    System.debug('Response: ' + responseBody);
} else {
    System.debug('Callout failed: ' + res.getStatusCode() + ' ' + res.getStatus());
}
This snippet shows a simple GET. You can similarly do req.setMethod('POST') and supply req.setBody(JSON.stringify(...)) to send data. Salesforce’s JSON class can help parse or generate JSON. The pattern is synchronous – the callout will wait for the external response (up to a timeout limit of 10 seconds by default, which can be increased to 120 sec for long-running calls using Continuation).
If you have long-running callouts or need to make many callouts, consider using Asynchronous Apex (like @Future methods, Queueable, or Batch Apex) so that the callouts don’t block a user’s transaction. For extremely long processes or if you need to wait for an external callback, Salesforce also supports a continuation mechanism (especially for Visualforce or Lightning components making callouts).
Using Named Credentials: Instead of embedding the endpoint and authentication details in Apex, Salesforce provides Named Credentials. A Named Credential stores the URL of the external service and (optionally) the authentication (like basic auth, OAuth, etc.). Your Apex code then simply refers to the Named Credential by name in the URL. For example, if you set up a Named Credential called “ExternalAPI” with URL https://api.example.com and an authentication token, your Apex can do req.setEndpoint('callout:ExternalAPI/data'). Salesforce will replace callout:ExternalAPI with the actual URL and attach the stored authentication header automatically. This is great for security (no hard-coded secrets in code) and ease of maintenance (if the URL or credentials change, update the Named Credential in Setup rather than editing code).
Outbound integration example: Let’s say whenever an Opportunity is marked “Closed Won” in Salesforce, you need to call an external order management system’s REST API to create an order. You could implement an Apex Trigger on Opportunity (after update) that checks if stageName changed to Closed Won, then performs a callout (perhaps asynchronously via a future method) to the external API endpoint /createOrder with the opportunity details in JSON. The external system will respond with, say, an order ID. You could then take that response and save it back in Salesforce (maybe populate an “External Order ID” field on the Opportunity or related object). This is a common pattern: Salesforce as the initiator of an integration when certain events occur. Make sure to handle errors – if the external API is down, you might catch the exception and decide to retry later or send an email alert to an admin. Apex callouts that fail will throw exceptions that can be caught in code.
Limits for Apex callouts: Salesforce has limits on how many callouts can be done in a single transaction (100 callouts per transaction) and how much total time. Also, callouts are not allowed after certain operations (e.g., you can’t do a callout after issuing a DML update in the same transaction unless you declare the method as @Future or use queueables, due to transaction order of operations). So sometimes you design around these limits by moving callouts to asynchronous context. Additionally, the response size from a callout can’t exceed 6 MB for synchronous Apex. Keep these in mind when designing the integration from the Salesforce side.
Exposing custom REST endpoints (Apex REST): As an aside, Salesforce also allows you to expose your own Apex classes as RESTful services (using @RestResource and related annotations). For example, you could create an Apex REST endpoint that an external system could call, if the standard REST API is not sufficient or if you want to encapsulate complex logic. That custom Apex REST will still use Salesforce’s authentication (the external system would still obtain an OAuth token to call it). The external call format would be /services/apexrest/YourEndpoint/…. Covering Apex REST in detail is beyond this guide, but know that it’s an option if you need custom integration logic beyond standard API capabilities.
Security Best Practices for Salesforce API Integration
Security is paramount when integrating with Salesforce. You are exposing access to sensitive data, so both Salesforce and the external application must be secured. Here are key security best practices:
- Use OAuth and avoid plaintext credentials: As discussed, OAuth 2.0 is the recommended way to authenticate. Do not hard-code Salesforce usernames/passwords in external systems. Instead, use a Connected App and OAuth flows or the JWT flow for server-to-server. OAuth tokens can be scoped to limit access. If using JWT, protect your private key securely. If you must use a username-password (e.g., for a simple script), ensure the password is stored encrypted and rotated often, and ideally use an IP whitelist (see below).
- Principle of least privilege: Create a dedicated integration user in Salesforce with a profile or permission set that grants exactly the access needed (and API Enabled). Don’t use a System Administrator’s credentials for integrations if not necessary. For example, if the integration only needs to read and update Account and Contact data, it should not have access to other objects. Similarly, in the Connected App, choose the OAuth scopes carefully. If the integration doesn’t need to perform requests on behalf of a user, consider the least permissive flow (e.g., JWT with a specific user).
- IP Whitelisting: You can restrict API logins to specific IP ranges. On the Salesforce Profile of the integration user (or via a Connected App policy), specify the allowed IP range of your servers. This ensures that even if a token or credentials were stolen, an attacker outside that IP range cannot use them. Salesforce will reject OAuth tokens or logins from unauthorized IP addresses. (Bear in mind if your system’s IP changes or if using cloud services, you might need to update this.)
- Secure storage of secrets and tokens: Treat the Salesforce consumer secret, certificates, and obtained tokens as highly sensitive. Store them in a secure vault or encrypted storage on the external side. Never commit secrets to source code or send them over insecure channels. If using client-side apps, use flows that don’t expose a client secret (like use PKCE or device flow). If your integration stores refresh tokens (which allow long-term access), encrypt them and restrict access.
- Use HTTPS and validate certificates: All Salesforce API endpoints are HTTPS – ensure your external system trusts Salesforce certificates (it should by default) and that it validates the certificate chain. For outbound callouts from Salesforce, the external endpoint must have a valid HTTPS certificate (self-signed certs need to be uploaded to Salesforce as a trusted cert if used). This TLS encryption ensures data in transit is secure.
- Token scope and revocation: When setting up the Connected App, only allow the scopes your app truly needs (for instance, if the app doesn’t need to modify data, you could give it read-only scope by using a combination of OAuth scopes and object permissions). If an integration is decommissioned or suspected compromised, revoke its tokens (Salesforce admins can revoke tokens via Setup > Security > Session Management or Connected App Oauth usage, or via API calls to revoke tokens). Also consider setting refresh token policies (e.g., expire refresh token if not used for 90 days, or immediately revoke on user logout depending on the scenario).
- Salesforce shield and encryption: If your org has Shield Platform Encryption or field-level encryption, understand how that might affect API clients. Encrypted field values via API may be masked unless the integration user has the “View Encrypted Data” permission (which is highly sensitive).
- Monitoring and logging: Regularly monitor your API usage and logs. Salesforce provides Event Monitoring (if licensed) which can log details of API calls. Even without it, you can see in Setup how many API calls are being made and by which users. Set up alerts (for example, an automated email or an event when API usage exceeds a threshold). On your external system, log the Salesforce API interactions (but not sensitive payload data) – e.g., log that “at 10:00, 20 accounts were upserted via API by process X”. This helps in auditing and troubleshooting security issues.
- Secure integration middleware: If you use an intermediary (like Heroku, AWS, etc.), secure those as well. For instance, if you have a middleware service that holds the Salesforce refresh token to periodically sync data, that service should be locked down (firewalled, proper IAM roles, etc.), because it effectively has keys to your Salesforce.
- Avoid exposing sensitive data unnecessarily: Only transfer the data that’s needed for the integration. If an external system doesn’t need a particular field, don’t include it in the API response or request. This reduces risk in case of interceptions or logs. Also, consider masking or hashing any sensitive personal data if it’s not needed in plain form on the other side.
- Test with security in mind: When building the integration, test what happens if someone tries to do something malicious. For example, if your external system constructs a SOQL query based on user input, ensure it’s not vulnerable to SOQL injection (always parameterize or escape inputs properly). If you expose a custom Apex REST service, implement permission checks and avoid running as admin without checks.
By following these best practices, you ensure that your Salesforce integration is not only functional but also resilient against unauthorized access. Salesforce’s built-in security (OAuth, profiles, IP restrictions) combined with prudent handling of credentials on the external side will protect your integration. As Salesforce documentation emphasizes, use strong authentication and adhere to their security recommendationsintegrate.io. Regularly review and update your security measures as threats evolve.
Common Errors and Troubleshooting Tips
Even with a well-built integration, you will encounter errors. Below are some common error scenarios when using the Salesforce REST API and tips to troubleshoot them:
- Authentication errors (HTTP 401 Unauthorized): This means the request didn’t have a valid access token. It could be missing (
Authorizationheader not set or malformed) or expired. Solution: re-authenticate to get a new token (possibly using a refresh token if you have one). If you immediately get 401 even after obtaining a token, ensure you’re actually including the token correctly. In Postman, for example, confirm the header is present. Also verify the user associated with the token isn’t inactive or lacking API permissions. - Forbidden errors (HTTP 403 Forbidden): A 403 from Salesforce could indicate OAuth scope or permission issues. For example, the token is valid but the user doesn’t have access to the object or field you’re trying to manipulate. Check the profile/permission sets for field-level security and object permissions. Another cause is hitting certain limits (for instance, if you exceeded your API daily limit, Salesforce may return 403 with an error code like
REQUEST_LIMIT_EXCEEDED). The error response JSON will usually have an"errorCode"and a"message"property giving more detail. If it’s a limit issue, you may need to reduce calls or wait for the 24-hour window to roll over (or contact Salesforce for a higher limit). If it’s a permission issue (INSUFFICIENT_ACCESSorENTITY_IS_DELETEDetc.), adjust the user’s rights or the integration logic. - Resource not found (HTTP 404 Not Found): This occurs if the URL is wrong – e.g., a typo in the object name or endpoint, or using an ID that doesn’t exist. Double-check the endpoint path (Salesforce APIs are case-sensitive for object names in the URL!). For example, using
/sobjects/account/instead of capitalAccountcan lead to a 404. If the URL is correct but an ID is not found, ensure the ID is valid and belongs to the same org (no cross-org access via REST). Also ensure you’re using the correct domain — if your token is from a sandbox, the instance URL will be*.sandbox.my.salesforce.comwhich might differ from login URL. - Bad request (HTTP 400 Bad Request): A 400 indicates something was wrong with the request format or data. This could be a malformed JSON (e.g., missing a comma or bracket), an invalid field name in your JSON, or an incorrect SOQL query (with syntax error). The response JSON often includes an error message pointing to the issue (for example,
"message" : "Unable to parse query string"or a field name that’s unrecognized). Fix any typos, check object and field API names. If the error complains about required fields missing when doing an insert/update, make sure you provide those required fields. For queries, ensure you URL-encode special characters and spaces. - Conflict or Lock errors (HTTP 409 Conflict): This is less common, but you might get a 409 if two processes try to update the same record at the same exact time (causing a version conflict). Salesforce uses record locking to prevent conflicts, but if not handled, your integration might occasionally hit this if, say, a user and the integration try to update the same record concurrently. The error might have
errorCodelikeENTITY_IS_LOCKED. The strategy here is usually to catch that and retry after a brief wait, or design such that collisions are unlikely. - Server errors (HTTP 500 Internal Server Error): A 500 from Salesforce is rare, but it can happen if something goes wrong on Salesforce’s end. It might also happen if you call a custom Apex REST service and that code throws an unhandled exception. The error response might not give much detail (for security, Salesforce doesn’t reveal internal stack traces via the API). If you encounter 500 errors consistently on a standard REST API call, it might indicate a Salesforce bug or a condition like extremely large payloads. You can open a Salesforce support ticket if needed, but first double-check that your request isn’t something known to cause issues (like extremely complex SOQL). If the 500 comes from custom Apex, you’ll need to debug that Apex (check debug logs in Salesforce around the time of the call for an exception).
- Timeouts: If an API request is taking too long, Salesforce may terminate it. For example, a very large query might time out and Salesforce could return a
QUERY_TIMEOUTerror. The recommendation is to simplify the query (selective filters, or break into smaller chunks). If your external system times out waiting for Salesforce (client-side timeout), consider increasing the timeout setting on your HTTP client, but also check why it’s slow (Salesforce might be under load or the query is inefficient). - Parsing errors: If your integration can’t parse the response, ensure you’re using the correct content type (Salesforce default is JSON – make sure your HTTP client isn’t assuming XML or something). Check the response body in a tool like Postman to see what’s coming. Sometimes integration code fails if a field is missing – remember that fields not set on a record may not appear in the JSON at all. Always null-check and handle optional fields in the JSON parsing logic.
- Salesforce specific error codes: Salesforce returns useful
errorCodestrings in errors. For example:INVALID_FIELD,MALFORMED_QUERY,INVALID_SESSION_ID,FIELD_FILTER_VALIDATION_EXCEPTION, etc. These are very informative. You can search the Salesforce documentation or knowledge base for these error codes to get hints on the cause. For instance,INVALID_SESSION_IDmeans your session (token) is not valid – maybe you tried to reuse a token after logout or IP change.INVALID_FIELDin a query means you asked for a field that doesn’t exist or isn’t accessible. Utilizing these codes in your error handling (maybe mapping them to more user-friendly messages or specific actions in your integration) can make troubleshooting easier.
Troubleshooting approach: When an integration call fails, do the following:
- Examine the full error response: Status code and the response body. The body often contains JSON like
[ { "message": "Something descriptive", "errorCode": "SPECIFIC_CODE", "fields": [] } ]. Use this info. - Replicate with a manual tool: If possible, try the same request with curl or Postman. This removes variables like your code logic. If it still fails, the issue is with the request or Salesforce side. If it succeeds, the issue might be how your code is sending the request.
- Check Salesforce logs: Salesforce has API logs and you can also enable Debug Logs for the integration user. If you suspect a Salesforce-side issue (especially for custom Apex or triggers that run as a result of the API call), a debug log can show you what happened during that API transaction.
- Use Salesforce Workbench: Workbench (workbench.developerforce.com) is a web tool provided by Salesforce that can also make REST API calls under your session. It’s handy to quickly test queries or see metadata. This can be an alternative to Postman for quick tests (in Workbench, go to Utilities > REST Explorer).
- Consult documentation and community: If an error is puzzling, the Salesforce developer docs and knowledge articles often mention common error cases. The Salesforce Stack Exchange community is also a rich source – many others may have hit the same error. For example, an error like “Not approved for access” on OAuth is explained by a connected app setting, and you might find that exact error discussed online.
Example of error handling in code: If writing integration code in, say, JavaScript or Python, design it such that when it receives an error response, it logs the error details and handles known cases. Pseudocode:
response = makeApiCall()
if response.status == 401:
    refreshTokenAndRetry()
elif response.status == 403:
    if "REQUEST_LIMIT_EXCEEDED" in response.body:
        waitAndRetryLater()
    else:
        log("Permission error: " + response.body)
        alertAdmin("Permission issue on integration")
elif response.status == 400:
    log("Bad request: " + response.body)
    fix or notify developer
...
This way, your integration is resilient and informative when issues occur.
Lastly, always test the integration under realistic conditions (with real data volumes and scenarios) before going live. What happens if 10,000 records sync? What if the Salesforce org has a bunch of validation rules that could reject some records? Ensure you handle those gracefully and provide mechanisms to reprocess failures after correcting any data issues. By anticipating errors and monitoring your integration, you can troubleshoot most problems quickly and maintain a smooth Salesforce integration experience.
References:
- Salesforce REST API Overview and Uses
- Salesforce OAuth 2.0 (Connected App and Flows)
- Composite API (batching multiple calls)roycon.comroycon.com
- API Limits (Daily usage example)salesforce.stackexchange.com
- Using Postman for Salesforce APIapexhours.com
- Security Best Practices (OAuth, whitelisting, encryption)integrate.iointegrate.io
- Common error codes and meaningsintegrate.io