

Mastering Salesforce permissions and access requires understanding multiple layers of security that work together in both Salesforce Classic and Lightning Experience. This learning plan is organized into modules that progress from fundamental concepts (suitable for beginners and Admins) to advanced topics (for experienced Developers and Architects). The core security model is the same in Classic and Lightning, with only the setup interface differing slightly.
We will highlight any UI differences where relevant. Below is the suggested learning path:
- Module 1 – Fundamentals of Salesforce Security: Overview of object vs. field vs. record access.
- Module 2 – Declarative Object and Field Access Controls: Profiles, Permission Sets, Field-Level Security (FLS), and Object permissions.
- Module 3 – Declarative Record-Level Access Controls: Org-Wide Defaults (OWD), Roles & Role Hierarchy, Sharing Rules (owner-based and criteria-based), and Manual Sharing.
- Module 4 – Programmatic Access Controls: Apex sharing (Apex managed sharing), sharing reasons, “with/without sharing” Apex classes, and custom sharing logic in code.
- Module 5 – Advanced Topics: Territory Management, external sharing considerations (Experience Cloud/portal users), manual sharing nuances, and securing API integrations.
Throughout each module, we include real-world examples and use cases. Comparison tables and summary diagrams are provided to clarify key differences (e.g. Profiles vs. Permission Sets). The plan ensures you build a strong foundation before moving to advanced concepts, covering both Classic and Lightning features
Module 1: Fundamentals of Salesforce Security
Begin with the layers of Salesforce data security. Salesforce secures data at three levels: object, field, and record . It’s crucial to grasp how these layers intersect: a user needs the proper object permission and record access to view or edit a given record, and even then field-level settings might hide specific fields. Key points:
- Object-level access: Determines which objects (tables of data, e.g. Accounts, Contacts) a user can see or edit. Managed via Profiles and Permission Sets (module 2).
- Field-level access: Controls visibility/editability of individual fields on an object (e.g. hide the Salary field). Also managed via Profiles/Permission Sets (module 2).
- Record-level access: Governs which individual records a user can see (assuming they have object access). Managed via sharing settings like OWD, roles, sharing rules, etc. (module 3).
These layers build on each other – for example, even if a record is shared with a user, they cannot see or edit it unless their profile or permission sets grant access to that object and field. Conversely, a user might have “Edit” rights on an object but still be unable to edit a specific record if record-level security denies them access (e.g. OWD set to Private and no sharing granted).
Understanding this interplay is foundational. Always remember: Profiles/Permission Sets (object/field access) and sharing settings (record access) work together – a user needs both to gain access, and the most restrictive setting wins when determining access. (One exception is when using special “View All” or “Modify All” permissions, which we’ll cover later, as those can override sharing.
Module 2: Declarative Object and Field Access Controls
This module covers the declarative (point-and-click) tools for controlling what data users can see and do at the object and field level. These are primarily administered via Profiles and Permission Sets in both Classic and Lightning (Setup > Users > Profiles / Permission Sets). We also discuss Permission Set Groups, which help bundle permissions, and how all these differ.
Profiles
A Profile is the baseline set of permissions and settings assigned to each user. Every user must have one (and only one) profile. Profiles include:
- Object permissions: Create, Read, Edit, Delete (CRUD) on each object. This is object-level access. For example, a profile might grant Leads: Read/Edit and Opportunities: Read while denying access to other objects.
- Field-level security (FLS): Controls which fields on those objects the user can see or edit (even if they have access to the object).
- Other settings: Login hours, IP range restrictions, app and tab visibility, record type assignments, and administrative permissions (like “Modify All Data”, “Manage Users”, etc.).
Profiles are often tied to a user license (which dictates available features). In Salesforce Classic, profile management is under Setup > Manage Users > Profiles, whereas in Lightning you can find Profiles via the Setup Quick Find. The functionality is the same.
Best Practice: Use profiles to grant minimum necessary access for a role. Historically, profiles were the main way to assign object/field permissions, but now Salesforce recommends using Permission Sets for most permissions and keeping profile settings minimal. Each profile should be somewhat generic (e.g. “Sales User Base Profile” or “Support Agent Base Profile”), and then specific access is layered via permission sets.
Special Profile Permissions: Some profile permissions override other security layers: for instance, “View All” or “Modify All” on an object will let the user see/edit all records of that object, bypassing sharing rules. “Modify All Data” is even more powerful (all objects). Be cautious with these; they are typically only on admin profiles or specific integration profiles, since they ignore record-level security.
Permission Sets and Permission Set Groups
Permission Sets are add-on permission grants that a user can have in addition to their profile. Unlike profiles, users can be assigned multiple permission sets (or none). Permission sets contain many of the same settings as profiles (object permissions, field permissions, user permissions, etc.), but they do not include some profile-specific settings like login hours or page layouts. Key points:
- Additive only: Permission sets can only grant additional access; they cannot take away permissions a user already has via their profile. If a user’s profile gives Create on Accounts, you can’t use a perm set to remove that – you’d have to adjust the profile. So design profiles with minimal access, then use perm sets to add on as needed.
- Flexible assignment: Because you can mix and match, permission sets enable assigning permissions based on job function or feature use. E.g., a “Marketing Features Access” permission set could be given to users across different profiles who need marketing app access, without creating a special profile for each combination.
- License considerations: A permission set can optionally be tied to a specific user license (meaning it’s only assignable to users of that license type). Many are “General” and not license-specific. Some features (e.g. Einstein Analytics) might require a license-specific perm set.
- Lightning vs Classic: The concept is the same. In Lightning, you manage permission sets via Setup Quick Find > Permission Sets (with a modern UI). In Classic, it’s under Manage Users as well. The assignment process is similar (select user > assign permission set).
Salesforce now strongly encourages using permission sets (and Permission Set Groups) as the primary way to grant object and field access, for better flexibility and packageability . A Permission Set Group simply groups multiple permission sets so you can assign them in one go. This helps manage users who need a bundle of permissions – for example, a “Call Center Agent Perm Set Group” could combine a base Service Cloud perm set, a Telephony integration perm set, and a Knowledge user perm set. The user gets the combined access of all in the group.
Expiring Permission Sets: For time-bound access, Salesforce allows setting an assignment expiration on a permission set. For example, you can give a user elevated permissions for 2 weeks, and it will automatically revoke. This is useful for temporary projects or trials
Field-Level Security (Field Accessibility)
Field-Level Security (FLS) controls whether a user can see or edit a specific field on an object. Even if a user has access to the object (e.g. can view the Contact records), FLS can hide particular fields (e.g. hide the “Birthdate” field) or make them read-only. This is critical for sensitive data. Key facts:
- FLS is configured in Profiles and Permission Sets. For each field on each object, you specify if profiles or perm sets grant No Access, Read, or Edit. If a user has any profile/perm set that gives at least Read, they can see the field; at least Edit allows edit (provided the record is editable to them).
- FLS is enforced across the app: it’s not just on the page layout, but also in reports, list views, APIs, and searches. If a field is hidden via FLS, the user truly cannot access it anywhere (even via API or formula). This is stronger than page layout visibility (which only hides on the UI form but not elsewhere).
- By default, new custom fields are visible to all profiles (except maybe in some license contexts). Admins should review FLS when adding fields to ensure least privilege.
- Lightning vs Classic: Both enforce FLS equally. The “Field Accessibility” menu in Setup (Classic) or Object Manager (Lightning) helps review which profiles see which fields.
Object Permissions Recap (CRUD and Beyond)
Object-level access is primarily about the CRUD permissions on an object (Create, Read, Edit, Delete) as configured in profiles/perm sets. Some additional object permissions include “View All” and “Modify All” (as mentioned) which override sharing. There are also “View All Data” and “Modify All Data” at the system level (in profile’s system permissions) – these grant access to every record of every object (essentially making someone an administrator). Only assign such permissions to very few trusted profiles/users, as they bypass all sharing rules.
| Profiles | Permission Sets |
| Required for every user (each user has exactly one profile). | Optional; users can have zero, one, or many permission sets. |
| Defines base level access (object perms, FLS, tabs, etc.) plus user settings like login hours, IP ranges, UI settings. | Grants additional access on top of profile (object perms, FLS, app access, and some system permissions). No login hour or page layout assignments. |
| Often broad – e.g. “Sales User” profile might include all core permissions a sales rep needs. | More granular – e.g. “Approve Contracts Permission” set to give a specific ability to certain users. |
| Tied to user license (cannot change a user’s profile to one of a different license type). | Most are license-agnostic (unless created for a specific license feature). Can be assigned across users of compatible licenses. |
| Best practice: keep profiles minimal (“least common denominator” access) and use permission sets to expand individual user rights ([Salesforce Data Security Model — Explained Visually | Best practice: create permission sets for specific needs or features and group them if necessary. This reduces number of profiles and makes security more flexible |
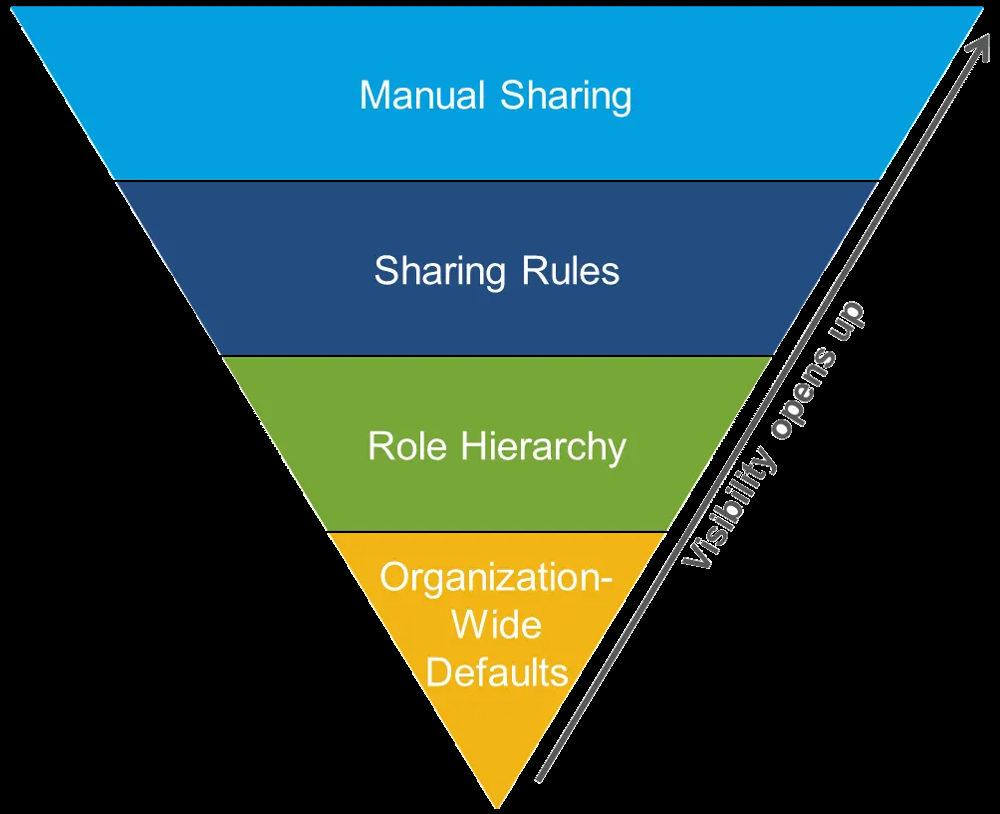
Module 3: Declarative Record-Level Access Controls
Once object and field access is sorted, the next step is controlling record-level access – which specific records a user can view or edit. Salesforce’s sharing model has a layered approach for this. Organization-Wide Defaults (OWD) set the baseline, then Role Hierarchy and Sharing Rules open up access on top of that, and Manual Sharing and other exceptions handle one-off or advanced scenarios. In general, you’ll configure these in Setup > Security > Sharing Settings (for OWD and sharing rules) and Users > Roles (for role hierarchy).
Let’s break down each component:
Organization-Wide Defaults (OWD)
OWD (Organization-Wide Default) sharing settings define the default visibility of records for each object when a user is not the owner or assigned via role hierarchy. Essentially, OWD answers: “If I own a record, who else can see it by default?” You set OWD separately for each standard and custom object in your org. Common OWD settings include:
- Private: Only the record owner and people above them in the role hierarchy can see the record. This is the most restrictive. For objects set to Private, users will not see others’ records unless sharing rules or other mechanisms grant access.
- Public Read Only: All users can view and report on all records, even if they don’t own them, but only owners (and their managers via hierarchy) can edit those records.
- Public Read/Write: All users can view and edit all records (however, only the owner or users with special permissions can delete). This essentially means no record-level security on that object – it’s open to the whole org for reading and editing.
- Controlled by Parent: (for child objects in master-detail relationships) Inherits the OWD from the parent object. For example, a Case might be controlled by its parent Account’s sharing setting.
- Public Read/Write/Transfer (for Leads and Cases): Allows anyone to transfer ownership in addition to read/write.
- Price Book: A special case object with options “Use”, “View Only”, etc.
When planning OWD, think of it as setting the baseline privacy. Start with the most restrictive that makes sense, then use sharing rules to open up where needed. For example, if only managers should see non-owned records on an object, use Private OWD and rely on the hierarchy; if peer-to-peer sharing is fine, Public Read Only might suffice.
Internal vs External OWD: Salesforce allows separate OWD settings for internal users and external users (like community/portal users). After Spring ’20, new orgs default external OWD to Private for all objects. In Setup’s Sharing Settings, you’ll see two columns for each object’s OWD: one for internal, one for external. Internal applies to your employees (standard Salesforce users logging in via internal licenses), External applies to Experience Cloud (community/portal) users. Typically, external OWD is kept more restrictive. External sharing nuances are discussed in Module 5.
One more setting on each object’s OWD is “Grant Access Using Hierarchies.” For standard objects this is always true (role hierarchy always applies), but for custom objects you can uncheck this box. If unchecked, users higher in the role hierarchy do not automatically get access to records owned by users below them for that object. You’d disable this if, say, you have a highly confidential custom object that even managers shouldn’t automatically see – you’d then share it via other means only. In most cases, you leave this checked so the role hierarchy works normally.
Roles and the Role Hierarchy
A Role Hierarchy is Salesforce’s way of hierarchically opening up record access. Roles are organized in a tree (hierarchy) that often reflects managerial or team structure. If you assign users to roles, those higher in the hierarchy will get access to records owned by those below them automatically (for objects where “Grant Access via Hierarchies” is enabled). This mimics a manager seeing their subordinates’ data.
Important aspects of roles:
- Not the same as Profiles: Roles are about record access (who can see whose records), whereas Profiles are about general permissions. For example, you might have a “Sales” profile for feature access, but within that, roles distinguish “Sales Rep” vs “Sales Manager” in terms of data visibility. Many users can share the same profile but have different roles, and vice versa.
- Hierarchy logic: By default, a role hierarchy means a user in Role A can see records owned by users in Role B if Role B is below Role A in the hierarchy. This cascades upwards – a director (higher role) can see records of all managers (lower roles beneath), and so on. If Role = CEO at top, that person can see basically everything if the hierarchy is fully utilized.
- Designing the hierarchy: It doesn’t need to match your org chart exactly. You design it based on who needs to see data from whom. Often it will resemble the org chart, but you might create separate branches for different departments that shouldn’t see each other’s records. A common design is to have roles by department and level (e.g. Sales Rep -> Sales Manager -> Sales Director, separate from Support Agent -> Support Manager, etc.). Users at the top of each branch (e.g. Head of Sales) might report to the CEO in the hierarchy so the CEO sees all data, but sales and support branches don’t see each other by default.
- Grant Access to Hierarchies: As noted, for standard objects and by default custom objects, role hierarchy sharing is automatic. If you create a custom object and want it completely private even to managers, you’d disable that as previously mentioned.
Setting up roles (in Setup > Users > Roles) in Lightning Experience provides a tree view similar to Classic. You assign each user a role via their user record. If a user has no role, they are outside the hierarchy (they’ll only see their own records and records explicitly shared).
Role vs. Role-and-Subordinates: In sharing rules (next topic) or reports, you’ll see options to share with a role “and subordinates.” That means if you choose, say, Role = “Sales Manager”, and include subordinates, it actually applies to both the manager and all roles under that (i.e. their reps). Keep this in mind when building rules.
Sharing Rules
Sharing Rules are automated rules that grant additional record access on top of OWD and role hierarchy. Use sharing rules to handle exceptions where certain groups of users need access to records they don’t own (and wouldn’t get via the hierarchy). Key points:
- Sharing rules can grant Read Only or Read/Write access. They never grant “Delete” or other special rights – those come from profile permissions. The rule just makes the record visible/editable to more users, assuming those users have object-level Edit permission.
- Two types of sharing rules: Owner-based and Criteria-based.
- Owner-based Sharing Rule: Grants access to records owned by certain users. You specify a source group of users (by roles, roles and subordinates, public groups, or territories*) whose records should be shared, and a target group who gets access. For example, “Share all records owned by users in Role X with users in Role Y. This is useful to share across parallel roles or teams (e.g. Sales <-> Support).
- Criteria-based Sharing Rule: Based on field values of the record rather than who owns it. For example, “Share all Account records where Industry = ‘Education’ with the Education Sales Team.” You set a condition (filter on record fields) and who to share matching records with. (This is available for most objects as an alternative to owner-based rules.)
- Public Groups: Instead of sharing to individual users or single roles, you often use Public Groups as the target or source in sharing rules. A Public Group is an admin-defined grouping of users, which can include users, roles, roles + subordinates, territories, etc., and even other groups. Public groups make it easier to maintain sharing logic (you can change group membership without editing the rule). For example, a group “Ops Team” might include specific users from various departments, and a sharing rule could share certain records with that group. Public groups are created in Setup > Users > Public Groups.
- Mutual exclusivity: If a user already has access via OWD or role hierarchy, you don’t need a sharing rule for them. Sharing rules are for opening access beyond that. Also, multiple sharing rules on the same object all apply (they are cumulative – if any rule grants you access, you get access).
No restriction by sharing rule: Remember that you cannot use a sharing rule to restrict access, only to open up. They only grant additional visibility beyond the baseline OWD. If you need to remove access for a subset of users, you have to use more restrictive OWD and then selectively open for others, not the other way around.
In Lightning Experience, you create sharing rules via Setup > Sharing Settings, clicking “New Sharing Rule,” choosing owner-based or criteria, etc. The interface in Classic is similar. After creating or changing sharing rules or OWD, Salesforce will recalculate sharing (this can take time if a lot of records; it’s essentially updating who can see what in the background).
Manual Sharing
Manual Sharing allows individual record owners (or users with certain authority on the record) to share one specific record to other users or groups. This is the most granular way to give access and is often used when an ad-hoc need arises that isn’t covered by OWD, roles, or sharing rules.
Key facts about manual sharing:
- The owner of a record (or someone above the owner in the role hierarchy) can share the record to any user, role, or public group. They can give Read or Read/Write access. In Classic, when viewing a record detail, owners see a “Sharing” button to do this. In Lightning, an admin must add the “Sharing” action (or enable the “Sharing” button) on the record page layout for the owner to use it. Once enabled, owners can click “Sharing” and manually add share entries.
- Manual shares create an entry in the object’s Share table (e.g. AccountShare, CustomObject__Share) with access granted. These remain until the owner or someone with access revokes them. If the record owner changes, manual shares are typically removed (since the new owner might not want the old shares). This is an important point: manual sharing is tied to the owner’s discretion. (Apex-managed shares can persist on ownership change; see Module 4.)
- Manual sharing is only available when OWD is not already “Public Read/Write”. If your object is open to all, there’s no need for manual share. But if it’s private or read-only, and you need to give a colleague access to one record, manual share is the way.
- Limitations: Manual sharing isn’t supported for all object types. For example, you cannot manually share activities (Tasks/Events) via UI. Also, high-volume community users (customer community licenses) can’t be targets of manual shares via the UI (they use a different sharing mechanism called sharing sets). But for standard internal users and partner users, manual sharing works if they have roles.
Summary: How Declarative Sharing Works Together
By combining OWD, roles, sharing rules, and occasional manual shares, you can meet complex security requirements declaratively. The general algorithm Salesforce uses to decide if a user can access a record is:
- First, does the user own the record or are they above the owner in the role hierarchy (for that object’s settings)? If yes, access is allowed (at least Read, Edit if they’re owner or profile gives edit).
- If not, is there a sharing rule or team membership or territory, etc. that grants access to the user or a group they belong to? If yes, they get that access.
- If not, did the record owner (or admin) manually share it to them? If yes, they have that access.
- Otherwise, the user cannot see the record.
- All of the above is moot if the user’s profile doesn’t allow the object or field – e.g. if the record is shared to them but they have no Read permission on that object, they still see nothing. Conversely, even if the sharing model would allow it, if their profile only allows Read on the object, they won’t be able to Edit, etc.
Always configure Org-Wide Defaults first (baseline), then roles, then sharing rules. You can test the sharing model by using Salesforce’s “Login As” to view data as a user, or by running reports/dashboards with “My Team’s records” to ensure the role hierarchy is working, etc. In Lightning, the Security->Sharing Settings page has a handy summary of OWD per object, and you can see the list of sharing rules. Also, the Record Sharing Hierarchy (available from a record’s Sharing button in Lightning) can show why a user has access – useful for troubleshooting.
Module 4: Programmatic Access Controls (Apex Sharing and Code)
In some scenarios, declarative sharing is not sufficient to meet requirements. For example, you might need to share records based on a very complex rule, or integrate with an external system that dictates sharing, or perhaps create a button that shares a record to a dynamic set of users. Salesforce provides programmatic means to handle these cases, mainly via Apex (Salesforce’s programming language). This module is geared toward developers and architects, but Admins should be aware of these capabilities in case they need custom development to extend sharing.
Apex Managed Sharing (Programmatic Sharing via Apex)
Apex Managed Sharing refers to using Apex code to create and manage sharing of records. All objects that support sharing have a corresponding Share object in Salesforce. For example, Account has AccountShare, a custom object Project__c would have Project__Share. By inserting or manipulating records in these share objects, you can grant or revoke record access just like a sharing rule or manual share would, but under program control. Key points:
- When to use Apex sharing: Use it when no declarative method can achieve the requirement. For instance, if sharing needs to be calculated from a complex set of conditions (maybe involving several objects) or when an external system’s logic decides who should see a record. It’s essentially a last resort if owner-based or criteria-based sharing rules aren’t enough.
- How it works: In Apex, you typically create a new Share record, set the ParentId (the record being shared), the UserOrGroupId (the target who should get access), an access level (Read or Edit), and a RowCause. RowCause is an important field indicating why the share exists. For custom objects, you can define custom RowCause values (called Apex Sharing Reasons) in Setup. For standard objects, Salesforce provides preset values (Manual, Rule, etc., though you can often use “Manual” as the RowCause for Apex shares on standard objects). By setting an Apex sharing reason, the share is marked as programmatic and won’t be removed by Salesforce’s automatic processes (except if you explicitly remove it).
- Maintaining Apex shares: Unlike sharing rules (which auto-recalculate) or manual shares (which auto-remove on owner change), Apex-managed shares are the developer’s responsibility to maintain. For example, if the logic for sharing changes or a record’s relevant criteria changes, your code needs to adjust the shares. Salesforce won’t automatically revoke an Apex share unless the record is deleted or you remove it. For custom objects, you can set up an Apex Sharing Recalculation class that Salesforce can run when ownership changes or when you call it, but you have to write this class (implementing a provided interface). This is advanced, but be aware that Apex shares require upkeep – they are not dynamic unless you make them so with code.
Security in Apex sharing: When code runs in Apex, it often runs in system context (ignoring user’s own permissions – more on that soon). However, when you insert share records, you are granting access, so be cautious to only do so when appropriate (and perhaps not give more access than the running user should be able to grant). Usually, only privileged code (run by an admin or with appropriate access) should create shares.
Another example: You might have a button “Share with Team” that, when clicked, runs Apex to share the current record with all members of the owner’s team (assuming such logic isn’t easily declarative). Apex could query the team members and insert share records accordingly.
Apex “with sharing” vs “without sharing” (Enforcing Sharing in Code)
When writing Apex classes, developers must decide whether the code will enforce the current user’s sharing rules or run in system mode ignoring sharing. This is controlled by the keywords with sharing or without sharing in the class definition. There is also inherited sharing (introduced later) which we’ll explain. Understanding these is crucial so that code doesn’t inadvertently expose data or conversely, doesn’t fail to do something due to lack of access when it should run as an admin utility.
- with sharing: Enforces that the code respects sharing rules. That means all SOQL queries in that class will only return records the running user is allowed to see (unless the code uses an inner class without sharing or explicitly does something else). Use this for classes that should only operate on data the user normally has access to. For example, a Lightning Aura or LWC controller that fetches case records for the logged-in support agent should be with sharing so that the agent only gets cases they’re permitted to see.
- without sharing: Specifies that the class ignores sharing rules, running in system context for record access. This means the code can query and update records regardless of who owns them or what OWD is. Use this carefully: typically for administrative or backend operations where you know the code needs full access to do its job (and you’ve done other security checks as needed). For example, an Apex batch job that fixes data across all accounts might be without sharing, so it can see all accounts.
- Default behavior: If a class is defined without either keyword, it defaults to without sharing (system mode). Many older classes might not declare it, which means by default they run without sharing. This can be dangerous if not intended, as it could expose data. Therefore, newer best practice is to explicitly declare or use inherited sharing.
- inherited sharing: This keyword means the class will run in the sharing mode of whatever called it. If it’s called from a class that was with sharing, it runs with sharing; if from without, it runs without. This is useful for utility classes or Apex triggers (triggers always run without sharing but you might want a helper class to run with sharing if invoked in another context). Using inherited sharing is a good practice especially for classes that could be invoked from multiple contexts, including Lightning flows or as future methods from both with-sharing and without-sharing classes. It helps ensure you don’t accidentally elevate privileges.
In summary, developers should default to with sharing for user-facing classes (ensuring they don’t expose unauthorized data) and only use without sharing when necessary for a system-level operation or where the business logic demands it. When using without sharing, always consider if you need to manually enforce any field-level security or object permissions, since running without sharing still does not automatically enforce FLS or object perms – Apex in system mode can retrieve fields the user can’t see on the layout, for example. Salesforce provides methods like Security.stripInaccessible to handle field security in Apex responses if needed.
Custom Apex Sharing Logic and Considerations
In addition to inserting Share records, Apex can implement custom sharing logic in various ways:
- Calculating Access: Apex can use custom logic (maybe stored in custom metadata or an external system) to decide who should get access. E.g., an external HR system might tell Salesforce which users can see a given Employee record – an Apex job could read that and apply shares accordingly. This is custom logic beyond what declarative tools offer.
- Revoking Access: Apex can remove share records as well (deleting entries from the Share object). For instance, if a project’s status changes, maybe the code removes certain shares. Admins should plan for revocation logic, not just granting.
- Platform Events/Triggers: Complex sharing logic might be triggered by changes. E.g., a trigger on a child record might share the parent. Or a nightly batch might adjust sharing based on data changes.
- Performance: Be mindful – if you’re sharing thousands of records to thousands of users via code, it can be heavy. Use batching and maybe reconsider data architecture (perhaps use a broader OWD if so many shares are needed). Also, shares themselves count against certain limits (each manual/apex share is a row in the Share table).
- with/without sharing interplay: If an Apex class that manages sharing is with sharing, remember that it might not “see” records to share unless the running user has access. Often, Apex that manages shares runs in system context (e.g. a trigger runs as the system so it doesn’t matter, triggers ignore sharing by default). If using an Apex controller that allows a user to share a record they can’t actually see, be cautious – that implies some elevated privilege.
Visualizing Apex sharing: In Setup, on a custom object, you might notice “Apex Sharing Reasons” where you can define labels for programmatic share rows. Also for custom objects, “Apex Sharing Recalculations” can list classes that recalc sharing. These are part of how programmatic sharing interfaces with admin UI.
Bottom line: Programmatic sharing is powerful but should be used judiciously. Aim to solve most requirements with declarative sharing first, and only use Apex sharing for complex, dynamic scenarios that can’t be handled otherwise. When doing so, ensure proper governance (documentation of the sharing logic, code that is efficient, and plan for maintaining the shares).
Module 5: Advanced Topics and Special Scenarios
Finally, this module covers advanced or special-case access control topics that experienced Admins, Developers, and Architects should be aware of. These include Territory Management (Sales Territories), external/portal user access considerations, manual sharing in depth, criteria-based sharing nuances, and securing data access for API integrations. Each of these can be critical in large or complex orgs.
Territory Management (Sales Territories)
Territory Management (now officially called Sales Territories as of Summer ’24) is an advanced feature for managing record access based on territories instead of or in addition to roles. Think of it as a matrix or parallel sharing structure to the role hierarchy. It’s especially useful when a company wants to give users access to records based on characteristics like geography, product line, or industry, which may not align perfectly with the managerial hierarchy.
Key concepts in Territory Management (often referred to as “Territory Management 2.0” in Lightning):
- A Territory Model is a hierarchy of Territory records (Territory2 object) that you define, similar to a role hierarchy but for territories. For example, you might have territories like “North America” with children “USA” and “Canada”, and under USA you have “USA-East”, “USA-West”, etc. Territories can also be based on other criteria like industry or market segment. A territory hierarchy can be as simple or complex as needed.
- Assignment of Users to Territories: Users can be assigned to one or multiple territories. This is crucial – unlike roles (one per user), a user can belong to multiple territories simultaneously. For instance, a salesperson could be in territory “West Coast” and also in territory “Healthcare Industry” if your model is multidimensional.
- Assignment of Accounts (and other records) to Territories: Accounts (and optionally related objects like opportunities, cases, contacts) are assigned to territories based on rules or manually. Territory assignment rules can automatically put Accounts into territories based on fields (e.g. an Account with billing state = CA goes into “California” territory). Each account can also be in multiple territories if applicable.
- Access Levels: For each territory, you configure default access levels for objects (similar to OWD but territory-specific). For example, users in Territory X might get Read access to accounts in that territory, and Read/Edit on opportunities in that territory, etc. You can set different access for account vs related opps vs cases. Territories thus grant record access to assigned users: if a user is in Territory X and Account ABC is assigned to Territory X, that user now can see ABC (even if normally private by role/OWD). If the user is in multiple territories, they get access from all.
- Territory vs Role: Roles still exist and play a part. Territory access can be configured to roll up through the role hierarchy if desired. For example, if a sales rep in Territory A reports to a manager, you might have the manager also automatically able to see the records (in practice, usually the manager would also be assigned to the territory or you rely on role for that). One key difference: with territories, you can give a user access to peer records without changing their role. It’s a separate axis. Often, organizations using territories might set OWD for Account to private and not rely on roles for account visibility, but instead use territories to share accounts to relevant users. It’s possible to use both (e.g. role hierarchy for managerial access, territories for cross-branch access).
- Enterprise Territory Management vs old Territory Management: Salesforce’s “Enterprise Territory Management” is the modern version (Territory2 object, etc.), available in Lightning (and partially in Classic). The old territory management (before Territory2) is outdated and not used in new orgs. The new model is much improved, with territory records and flexible assignment rules. Since Summer ’24 they just call it “Sales Territories”, but it’s the same feature.
To learn territories: focus on how to enable it (in Setup, activate territories), define territory hierarchy, assign users and accounts, and set access rules. This is often an Architect-level topic because it involves significant planning and coordination with sales strategy. It’s usually used in sales contexts where orgs want to ensure the right reps have access to the right accounts based on geography or other criteria, potentially overlapping.
Territory management also has implications for forecasting and analytics (e.g. territory forecasts) but from a pure sharing perspective, it’s about assigning and opening up record access beyond roles. Learning Path tip: If you need Territory Management, consider doing the Trailhead module on it and reading Salesforce’s Territory Management guide. Practice by modeling a small hierarchy and assigning a sample account and user to see the effect. Note that enabling it is an irreversible action in an org (once on, you have the objects and cannot revert to not having it).
External Sharing and Access for Experience Cloud (Portals)
When dealing with external users (partners, customers, or any community users), Salesforce has some special sharing considerations. Many concepts remain the same (profiles, roles, etc.), but there are differences in how external users are set up:
- External User Licenses and Profiles: External users use Experience Cloud licenses (Customer Community, Partner Community, etc.). These users still have profiles (often labeled “Customer Community User” profile, etc.) which limit their object access. They also can have permission sets. As an admin, you’ll manage their profiles’ object and field permissions just like internal users (but those profiles might restrict certain objects by default).
- External OWD: As noted, each object has an “External OWD” setting in Sharing Settings. Typically, you keep these as or more restrictive than internal. For example, Accounts might be Public Read internally (if you want all employees to see all accounts) but Private externally (so partners or customers cannot see all accounts, only those explicitly shared to them).
- Roles for External Users: Partner Users (community users with Partner license) actually get a role in the role hierarchy beneath their associated Account’s owner. When you enable a Partner user, Salesforce creates a role for them (and their subordinates up to 3 levels). This allows using role hierarchy and sharing rules to give partners access to records (usually only within their account and below). Customer Community (non-partner) users do not get roles if they are the high-volume license type (Customer Community Plus have roles, Customer Community license (high volume) do not). This difference is important:
- Partner and Customer Community Plus users: They have roles and can be added to public groups, sharing rules, etc., similar to internal users (with some limits).
- Customer Community (standard/high-volume) users: They have no role and cannot be in groups or ownership-based sharing rules. For these, Salesforce uses Sharing Sets and Share Groups for record access.
- Sharing Sets: A feature for high-volume external users to access records associated with them. For example, a sharing set can say “Customer users with Account = X can see Case records where Case.Account = X.” Basically it shares records based on a matching field to the user’s account or contact. This is configured in the community settings, not via regular sharing rules.
Guest Users: These are completely external, unauthenticated users (for public pages in a community or Force.com site). Guest users have a special profile and by default extremely limited access (OWD for external is typically private, and guest user profile has almost no read on objects). Starting in 2020, Salesforce locked down guest users – they cannot own records and you must explicitly opt-in to allow guest users to read or create certain records. If you plan to have public content (like a knowledge base), you might create guest user sharing rules or use the “Public Read Only” OWD for an object’s external setting. Be very careful here, as exposing data to guest (public internet) is a major security decision.
When learning about external sharing, key things to study are: how to set up a partner user (and how their access to their account’s data is configured, e.g. an account owner can use an Account Sharing Rule or manual share to give the partner access to their account record itself), how sharing sets are configured for customer communities, and understanding limits (like high-volume users can’t do manual sharing or be in groups). Salesforce’s documentation on Experience Cloud security is a great resource, as is the Sharing and Visibility design guide which often covers internal vs external differences.
Other Advanced Sharing Considerations
A few additional topics that are useful as you advance in mastery:
- Record Ownership and Queues: Only one user or queue can own a record. Queues (for objects like Cases, Leads, custom objects) can own records and multiple users can be members of a queue, giving them access to those records (queue membership acts like a group for ownership sharing). Consider using queues as a mechanism to group ownership (beyond just individuals).
- Account Teams & Opportunity Teams: These are specialized sharing mechanisms. For instance, an Account Team is a set of users defined on a particular Account record who have roles like “Account Executive”, “Sales Engineer” on that account, each with specified access levels. Adding someone to an Account’s team can automatically share the account (and optionally related opps/cases) with them. Opportunity Teams similarly share that opp with team members. Teams are a form of manual sharing but with structure and are great for collaborative selling. Admins can enable team selling and specify default team access.
- Implicit Sharing: Salesforce automatically grants some access in certain relationships – e.g. Opportunity access to Account owners (if you own an account, you implicitly get access to child opps), or access to parent account for those who can see a child (like case or contact). These are behind the scenes and you can’t configure them, but be aware (they often answer “why can user X see this record” – maybe because they own a related record).
- “View All Users” Permission: Not directly about record access, but note that by default all users can see basic info about other users (like in lookups or sharing dialogues). There’s a perm “View All Users” that if unchecked for a profile (in some external cases) can restrict that. This matters in communities where you might not want users seeing each other in the UI.
Shield Platform Encryption: If using encryption, it doesn’t change sharing, but it may affect how certain fields are accessible or queryable even if user has access (some fields might appear masked if not having encryption key permissions, etc.). Just a note that field security can be further enhanced with encryption, which is an overlay on the access model.
Access via API Integrations
Securing integrations is an important aspect often overseen by Architects and Admins. When external systems connect to Salesforce via API (REST/SOAP/Bulk), they do so as a Salesforce user. The question is: how to set up that user’s permissions and access properly?
Integration User Best Practices:
- Use a dedicated Integration User account for each integration (or each external system). This user should have a profile or permission sets granting exactly the access that integration needs – no more. Avoid using a general admin’s credentials or a shared single user for all integrations, as that violates the principle of least privilege. If each integration has its own user, you can control and monitor their access separately.
- “API Only” profile or Integration User License: Salesforce provides a special user license called Salesforce Integration (with profiles like “Minimum Access – API Only Integrations”). This profile is locked to disallow UI login (so the user can’t log into Salesforce UI, only API) and has no permissions except API access by default. Starting Spring ’24, many orgs have a few of these licenses available out-of-the-box (e.g. 5 free integration users in Enterprise+ editions). Use this for integrations to enforce that the account can’t be used interactively and starts with minimal rights. You then assign specific permission sets to grant objects/fields the integration needs.
- Assign minimal object permissions: If an integration needs to read and write to only Contacts and Cases, then that integration user’s profile/perm sets should only have access to Contacts and Cases (and perhaps to no other objects). If it doesn’t need to see Opportunities, don’t give it access. This way, if the integration is compromised, it can’t siphon other data.
- Consider “View All” carefully: Some integrations (like data backups or sync tools) may need to bypass sharing to function correctly. In such cases, rather than giving them full admin, you might give the user “View All Data” or specific “View All” on objects needed. This allows it to see everything on those objects. If you do this, you’re basically bypassing sharing for that user – which might be necessary for an integration that must access all records. But again, do it only if needed and only on required objects. Monitor the usage.
- Login IP ranges and network security: You can restrict the integration user’s login IP range to the IP of your middleware server or whatever is calling the API. This prevents the credentials from being used elsewhere. Also use strong, long passwords or certificate-based auth, or better, use OAuth tokens via a Connected App. Ideally, use OAuth with a Connected App that has a refresh token flow, so you’re not embedding credentials in code.
- Audit and Monitoring: Treat integration users as privileged accounts. Monitor their logins and API usage (via event monitoring or API usage logs). If an integration only runs weekdays, consider freezing the user on weekends or using an API-only profile that you deactivate when not in use, etc., if appropriate.
- API Enabled permission: The profile must have “API Enabled” (most do by default except some like Standard Platform One profile). The integration user license profiles have this enabled and not editable.
- Testing with sharing: If your integration uses a normal user with limited profile, remember the data it can pull via API is subject to that user’s sharing rules. For example, if an integration user doesn’t have access to closed cases (maybe a sharing rule doesn’t include them), the API calls will only return what that user can see. Sometimes, this principle is used to an advantage: e.g. if you only want to sync subset of data, use a user that only sees that subset. But usually, integrations need either all data or a clearly defined set of data.
- API Only vs UI: If an integration user tries to login via the UI, Salesforce will show “API Only user – access restricted” message. This ensures even if someone got the credentials, they can’t use the normal web interface to do mischief.
Another scenario: an external system needs to create and update records in Salesforce (say, leads coming from a web form service). You give the integration user Create/Edit on Lead and perhaps on Account/Contact (if it needs to link or create those). The user does not have permission to delete or view other objects. If the integration gets compromised, the damage is limited to leads and accounts – it can’t access Opportunities or Cases, etc.
API Integration Wrap-up: Always document what access each integration user has and why. As you grow in architecting solutions, you may have dozens of integration users – keeping track ensures none have excessive rights. Leverage tools like Connected App policies (where you can define IP ranges and OAuth scopes for the integration) and consider using Named Credentials in Salesforce (for callouts, though that’s for outbound calls).
Conclusion and Next Steps
This learning plan provided a structured approach to mastering Salesforce Permissions and Access, from basic declarative security to advanced programmatic sharing and special features. To recap the suggested progression:
- Beginner (Admins): Start with object and field security (Profiles vs Permission Sets, FLS) and understand the fundamentals of record sharing (OWD and Role Hierarchy). Practice by configuring a new profile and setting OWD in a dev org.
- Intermediate (Admins/Devs): Add sharing rules to your skillset, and learn to troubleshoot record access issues (“Why can User X not see Record Y?”). Build some examples – e.g., create a criteria-based sharing rule and see it in action. Also explore the “Sharing” button behavior in Lightning vs Classic.
- Advanced (Devs/Architects): Dive into Apex managed sharing and write a small Apex sharing example (if you have dev skills). Experiment with “with sharing” vs “without sharing” classes to see the difference in query results. If possible, enable a Territory Management in a sandbox and simulate a territory-based access scenario. Also, study external sharing by creating a dummy partner user or customer user in a trial Experience Cloud site to see how their access differs.
- Expert (Architects): Focus on combining all the above in a coherent Sharing Model Design. Document a design for a fictitious company with requirements (who should see what) and decide which mechanisms (roles, rules, territories, etc.) to use. Optimize for least privilege and future scalability. Review Salesforce Sharing and Visibility Designer certification materials for best practices and pitfalls (like group membership limits, territory vs role trade-offs, etc.).
Finally, always stay updated with Salesforce releases. For instance, new features like Restriction Rules (introduced in recent releases) can further filter records for certain users beyond sharing rules, and enhanced account role sharing for partners, etc., might appear. The core concepts here remain foundational even as new features come. By following this learning plan and practicing each component in real or sandbox scenarios, Admins, Developers, and Architects will gain a robust understanding of Salesforce permissions and access control, ensuring data is both secure and accessible to the right people.
If you see something incorrect, please reach out to me so that I can correct it. Here’s my LinkedIn: Kamal Thakur. Until then, Happy learning!
References: Salesforce Documentation and Community Resources:
- Salesforce Developers Blog – “Salesforce Data Security Model — Explained Visually” (overview of object/field/record levels) (Salesforce Data Security Model — Explained Visually | Salesforce Developers Blog) (Salesforce Data Security Model — Explained Visually | Salesforce Developers Blog)
- Salesforce Help – Organization-Wide Defaults and Sharing Settings (definitions of Private, Read Only, etc.) (Salesforce Data Security Model — Explained Visually | Salesforce Developers Blog)
- Salesforce Architect Guide – Platform Sharing Architecture (best practices for role hierarchy, public groups) [Salesforce Architects][Salesforce Architects]
- Salesforce StackExchange – Profile vs OWD clarification (interaction of profile CRUD and record access) (force.com – Profile Permissions v/s Org-Wide Defaults – Salesforce Stack Exchange) (force.com – Profile Permissions v/s Org-Wide Defaults – Salesforce Stack Exchange)
- SFDC Wallah Blog – “With Sharing, Without Sharing and Inherited Sharing” (Apex class sharing keywords explained) (With Sharing, Without Sharing and Inherited Sharing – SFDCWallah)
- SalesforceBen – “Territory Management in Salesforce: 10 Things You Need to Know” (Sales Territories overview and considerations as of 2024) (Territory Management in Salesforce: 10 Things You Need to Know | Salesforce Ben)
- Salesforce Admin Blog – “Best Practices for Configuring Your Integration User” (guidance on least-privilege for API users) (Best Practices for Configuring Your Integration User – Salesforce Admins) (Best Practices for Configuring Your Integration User – Salesforce Admins)
Amazing……
Thanks