

Salesforce DevOps Center Introduction
Salesforce finally brings the DevOps Center for Deployment and Release Management which give pro-code and low-code approach. Salesforce DevOps Center will be the replacement for the change sets and will provide us with a point-and-click UI to deploy the changes between different salesforce environments. If you’ve used any DevOps tool in Salesforce like Copado, it is basically similar to that. Currently in Open Beta, DevOps Center will use Github for source control. Integration with other Source Control tools, like Bitbucket, and GitLab are still in the pipeline for the future.
DevOps is currently in Public Beta and will be generally available on October, 22. In this post, I will go through the Installation and the basic terminology definitions. I mainly want to show you a working example of how things will work using DevOps Center.
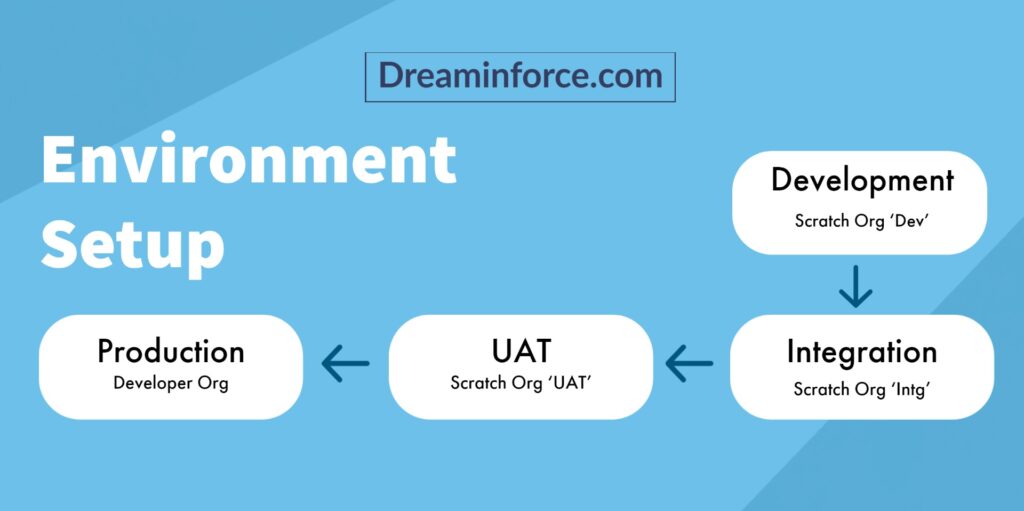
For Production, I will create a Developer Org. For sandboxes, I will make Scratch Orgs that will act as dev environments/sandboxes. Here’s the structure of Environments we will be following in this Salesforce DevOps Center example:
Salesforce DevOps Center Installation
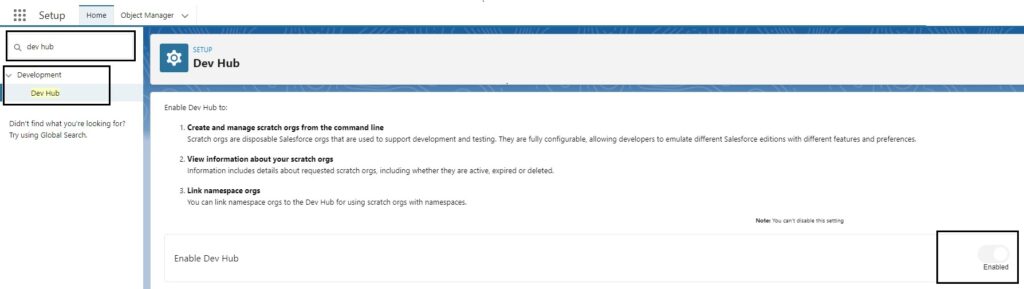
Enable Dev Hub
We need to perform an additional step, just for this demo. We will need to enable the dev hub in the Developer Org as we need to create Scratch Orgs that’ll work as sandboxes in our example. So go ahead and login into your developer org and type Dev Hub in setup. Now click on Dev Hub and Enable the Dev Hub as shown below screenshot:
Enable DevOps Center and Package Installation
Goto Setup > DevOps Center
Enable the DevOps Center as shown in the below screenshot:

Once you enable the DevOps Center, we’ll need to install the Package. Yes, you heard it right. The Salesforce DevOps Center is a Managed Package. Now go ahead and click on Install Package and install the package for admins only for now.
To see if the package is installed, go to Installed Packages and check if there’s a package named ‘DevOps Center – Beta’. If it’s not there, give it a minute or check this link.
DevOps Center Connected App and Permissions
The next step would be creating a connected app. I will not go into details but follow this link to create Salesforce DevOps Center connected app. After creating the Connected app, you’ll need to assign the permission sets to the users who can use and manage the DevOps Center. Follow this link to Assign the DevOps Center Permission Sets.
DevOps Center App
Now, the Package is installed and permissions are also given to users. It’s time to launch the App. Goto App Launcher and type DevOps and click on DevOps Center.
DevOps Center Project
As per Salesforce,
A project is your team’s central arena for work. The purpose of a project is to help you and your team collaborate and manage changes being developed for a particular application.
For the DevOps setup purpose, we need to create at least one Project. But before we create a new Project, we need something first. DevOps Center requires you to have a Github-hosted account. If you’re new to Github, here’s a wonderful module on Trailhead, Git, and GitHub Basics.
Now from DevOps Center App, click on New Project and Click on ‘Connect to Github’. Link your Github Account and it will redirect you to DevOps Center App after authorization. Click on New Project, either create a new Repository or use an already created one. I am using these below options:
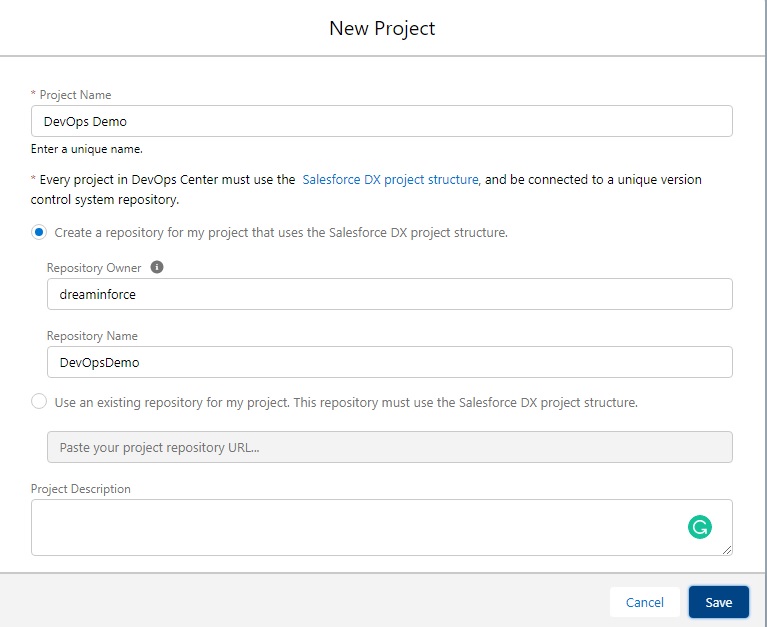
Once you save it, it will create a new Project with a new Github Repository. Before proceeding, we’ll need to understand some basic terminologies.
- Releases: Any set of changes will be grouped into a release. A release is split into one or more user stories.
- Work Items: These contain the list of metadata items that are being changed. These are the changes that you’ll be pushing through the Development Environments into the Production.
- Pipelines and Stages: The pipeline defines the sequence of stages that work items progress as they go through the release lifecycle from development through to production (or some other final release stage).
- Source Control: Behind the scenes, DevOps Center manages all GitHub branches, including moving metadata between branches, and Salesforce orgs.
Configuring Environments for Pipeline
Click on the DevOps Demo Project name from the list of the Projects and add the Production Environment(current developer org). In this demo, we are using our developer org as the Release/Production org. See screenshot:

Once Developer Org is authenticated and added, click on ‘All Environment’ from the All Projects list. See the below screenshot:

Click on Pipeline and see at the End of the Pipeline that we have our Production Org added. Production is set, now we need to add sandboxes. In our case, the scratch org are the sandboxes. We need to create 3 Scratch Orgs, with the name ‘Dev’, ‘Intg’, and ‘UAT’. Think of these Scratch Orgs as your developer sandboxes. We start our Development in Development Environment, which is ‘Dev’, and we Integrate our changes in Integration, i.e ‘Intg’ and User Acceptance Testing in ‘UAT’. Then the final stop, Production.
If you are new to the concept of Scratch Orgs, here’s the link to my other post ‘What are Scratch Orgs and how to create them‘. Make sure to note down the Username/Password of these Scratch Orgs somewhere because we’ll need them when we add them as an environment in the Pipeline.
Now, we have created the three Environments. Now it’s time we add them to the Pipeline. Click on DevOps Demo Project from the All Project list. Now you’ll see a screen like this
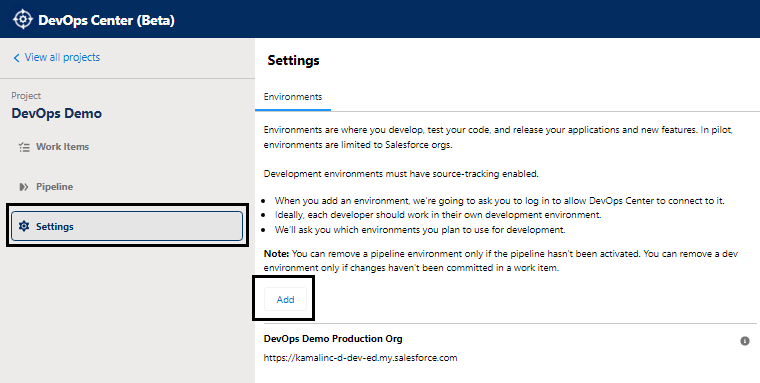
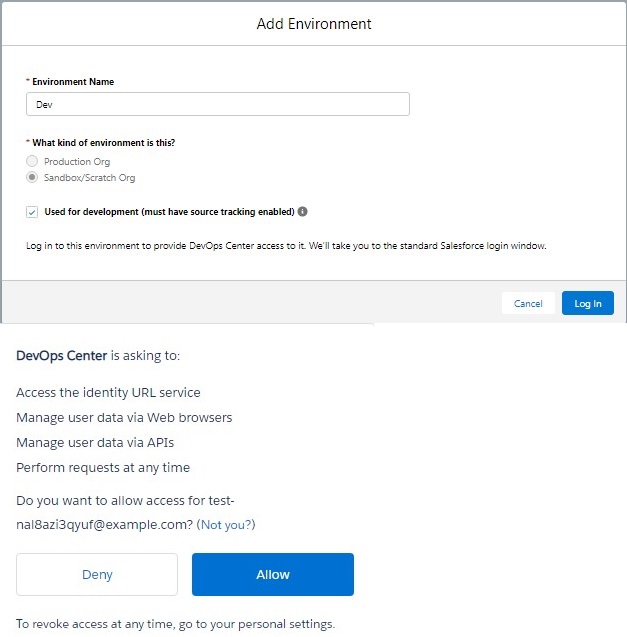
Click on Settings from the left side and Click on Add. Put the Environment Name as Dev and check the Sandbox/Scratch Org option with the checkbox that says ‘Used for development (must have source tracking enable)’.
You’ll be redirected to the new login page. Here, put your Dev Scratch Org credentials and Allow the access. Check the below screenshot:
Once you allow it, go to Settings, and you’ll see the ‘Dev‘ environment added. Click on Pipeline and you’ll see the start and end of the Pipeline. Now, it’s time to add the ‘Intg‘ and ‘UAT‘ environments. But you must be seeing an extra stage by the name of Staging, which we don’t need. So we need to delete the Staging Stage from the pipeline.
Click on the dropdown icon next to the Staging stage and click on ‘Remove Stage’.
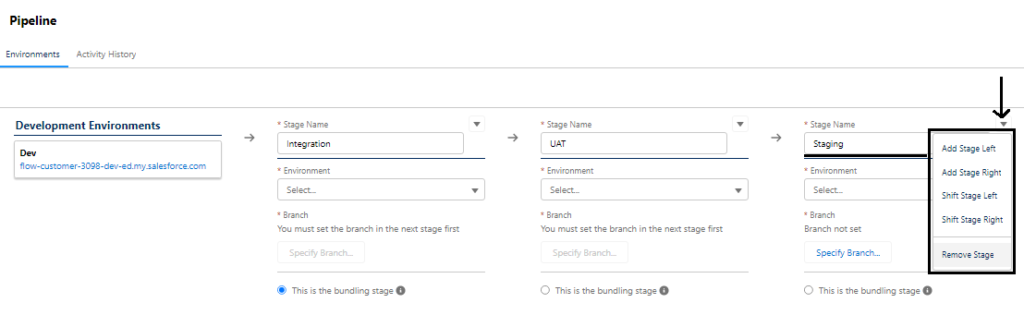
Now, follow the same steps we followed to add the ‘Dev‘ environment to add the remaining ‘Intg‘ and ‘UAT‘ environments. But make sure that after you add them, select the respective environment in the Pipeline.
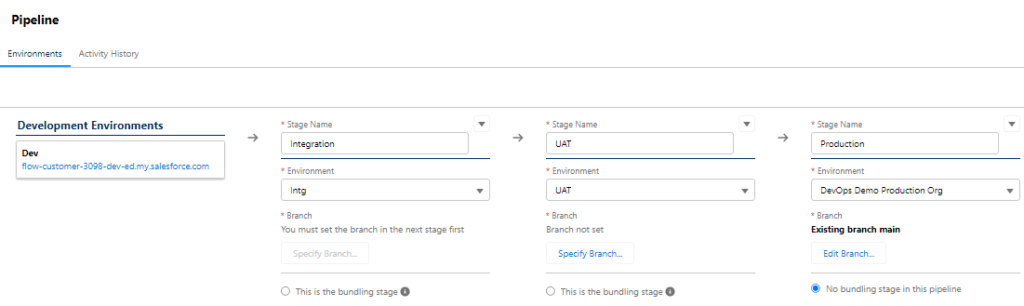
Once you add all the Environments, your pipeline must look like this:
Specify Branches for your Pipeline Stages
Now, that we’ve selected all our Environments in our pipeline, it’s time to select the Branches. In the above screenshot, you can see the mandatory option of Branch. You can also see that it’s already selected for the Production environment(because we created a new repo when we linked our Production org). Now, click under the UAT, ‘Specify Branch..‘ button. Here you can either create a new branch or use an already built branch. For this demo, we’ll just create a new one.
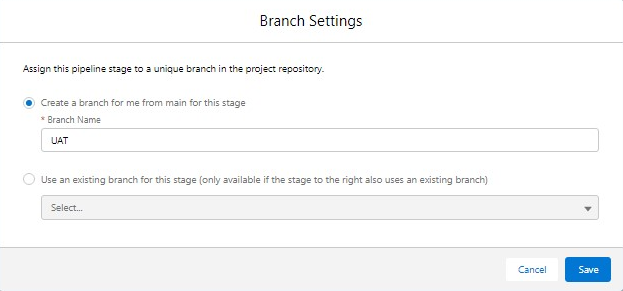
Repeat the step for ‘Intg‘ Org as well and name the branch as ‘Intg‘. The pipeline will look something like this:
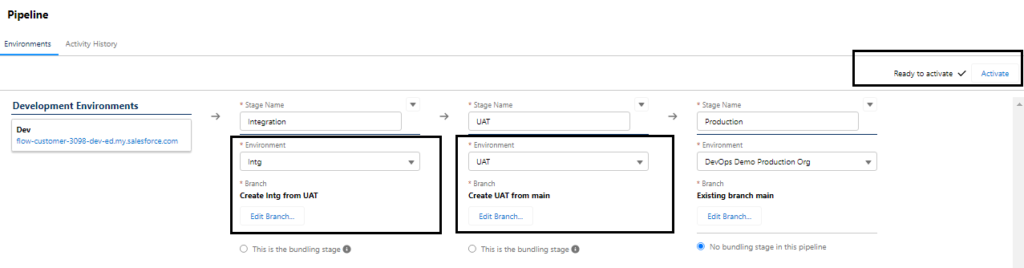
See that there is no orange warning sign on the top right corner and branches are also selected. Now our pipeline is ready to be activated. Go ahead and click on Activate from the top right. Now you’ll see a different layout of the pipeline section, like this:

Now we are ready to roll. Let’s move some changes through this pipeline.
Salesforce DevOps Center Testing
Goto Work Items and create a new Work Item. Add subject whatever you want for now and assign the Work Item to yourself. Open that Work Item record and it will ask you whether you want to develop and commit changes to a feature branch inside or outside Salesforce DevOps Center. Select the first option and from the drop-down select Dev.
Go to your Dev Scratch Org and Create a new Trigger. This Trigger doesn’t have to contain anything, just create a simple Account Trigger with a debug log inside it. Now go to the Work Item in your Production Org, and Click on the Pull Changes button from the Work Item detail page. It will pull the Account Trigger and then we have to commit the Account Trigger. Select Account Trigger and add a commit message, something like this below:
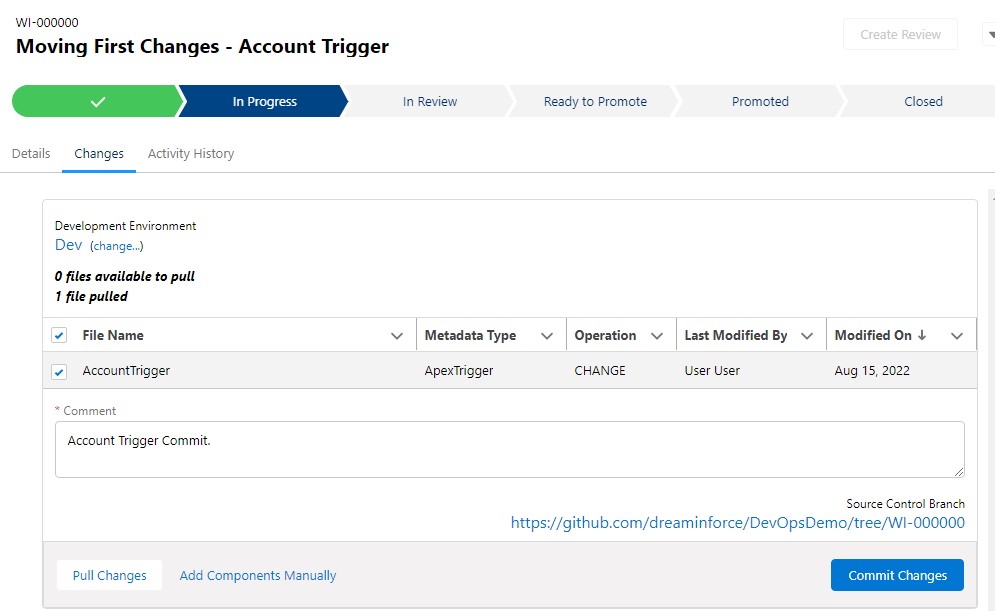
Click on Commit Changes. Now, these changes will be Pushed to the feature branch in Github. If you go to your GitHub account, you’ll see a new Feature branch created, and in that our Account Trigger.
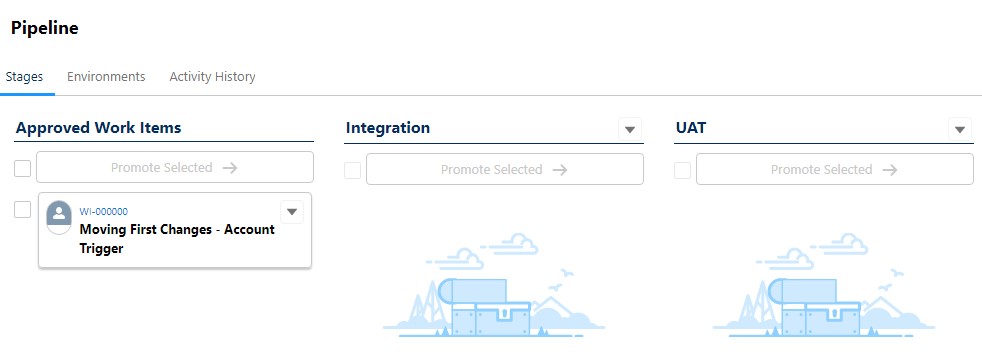
From the Top right, click on create Review. Once it is moved to In Review, go ahead and Toggle the Ready to Promote from the top right. Now our changes are Promoted and ready to be moved into the Integration environment. To verify, go to Pipeline and click on Stages and you’ll see something like this:
Now from the top right, click on View Change Request and it will redirect you to a Merge Request in Github. We are merging the changes from our Feature Branch to the Integration branch. Once you merge, we are done with the Work Item as we pushed our changes to the Integration branch in Github, but not in the Intg org. Goto Pipeline > Stages:
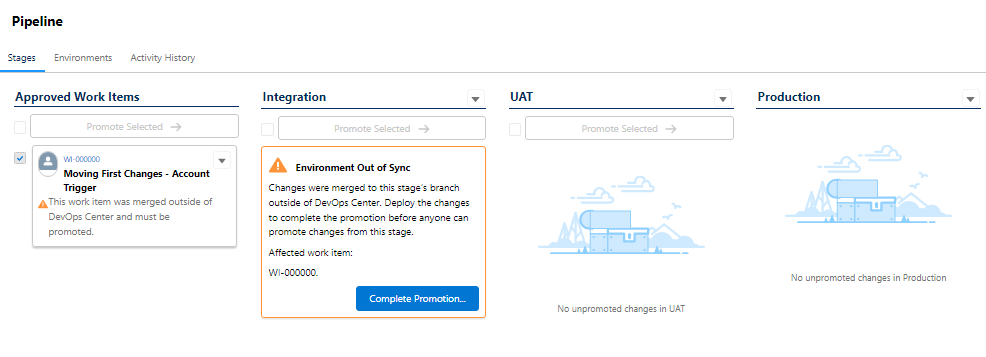
Click on Complete Promotion. Now from the Promotion Option, click on the ‘Changes not in Integration stage‘ and ‘Default‘ options. After it’s done, you’ll see that the changes are moved to Integration. Now to move the changes further just select your work Item in Stages and click on Promote Selected:
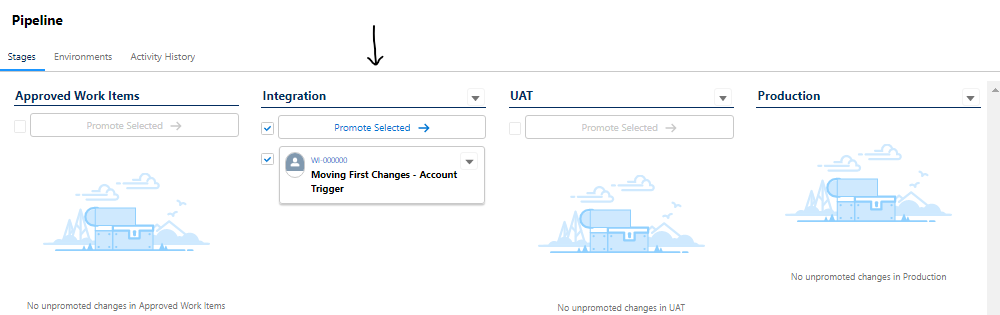
Now from the Promotion Option, click on the ‘Changes not in Integration stage‘ and ‘Default‘ options. Do the same steps until the changes reach the Production Environment.
Final Screen:
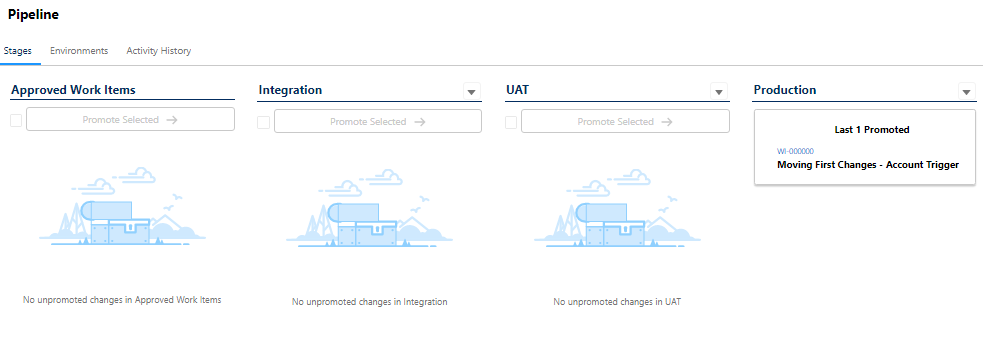
Verify Changes in all your environments in salesforce as well in Github. All changes are now synced.
Thoughts on Salesforce DevOps Center
I think Salesforce DevOps is a great tool for the future and a perfect replacement for the Change Sets. Yes, it is not complete but as things go forward, we see a bright path for the DevOps Center. If you want to see all the Limitations of Salesforce DevOps or How to overcome these limitations, read the bottom of this interesting article by Ian Gotts.